- Home›
- Healthy Living›
- 6 Helpful And Effective Yoga Asanas To Boost Immunity And Stay Healthy
6 Helpful And Effective Yoga Asanas To Boost Immunity And Stay Healthy
By: Priyanka Maheshwari Mon, 19 June 2023 7:17:30
In the midst of a global pandemic, the significance of taking proper care of one's health has never been more emphasized. The focus now turns primarily towards maintaining good physical and mental well-being.
To ensure physical fitness, it is crucial to prioritize the immune system, which serves as our body's defense mechanism against infections and viruses. Aside from safeguarding us against diseases, the immune system also plays a vital role in promoting mental well-being. A robust immune system has often been associated with relaxation and stress reduction.
Incorporating yoga into our daily lives is a highly effective method for developing and nurturing a strong immune system. Numerous studies have suggested that regular practice of various yoga asanas can potentially enhance the immune system.
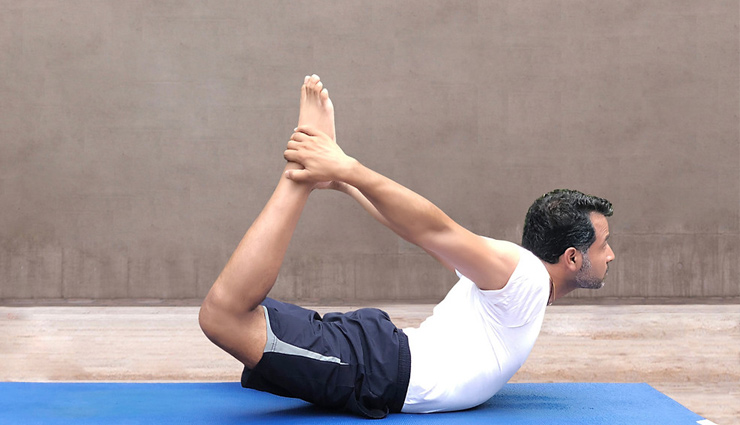
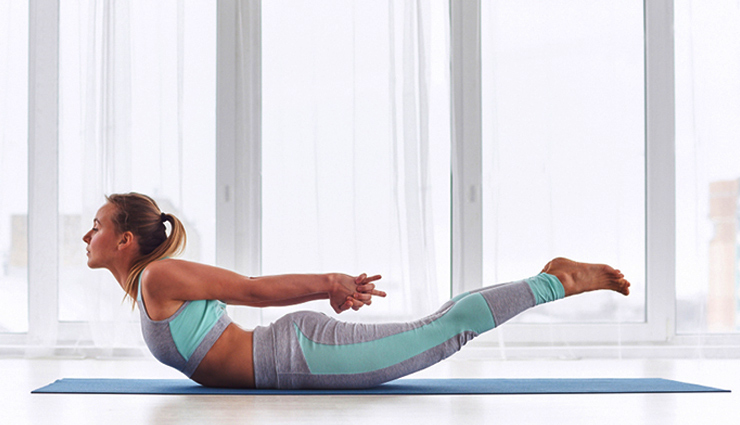
# Dhanurasana
Dhanurasana, also known as Bow Pose, is a yoga asana that involves arching the body in a shape resembling a bow. Here are the steps to practice Dhanurasana:
- Lie down on your stomach (prone position) on a comfortable yoga mat or a soft surface.
- Relax your body and place your arms alongside your body, with your palms facing upward.
- Bend your knees and bring your heels closer to your buttocks.
- Reach back with your hands and hold your ankles. Your thumbs should be pointing towards your toes.
- On an inhalation, lift your heels away from your buttocks and simultaneously lift your thighs off the mat. This action will begin to lift your upper body as well.
- As you continue to inhale, lift your chest and head off the mat, keeping your gaze forward.
- Maintain the pose by balancing on your abdomen and pelvis, while keeping the weight evenly distributed.
- Focus on elongating your spine, stretching your body, and lifting higher. You can gently kick back with your feet to increase the arch if comfortable.
- Hold the pose for a comfortable duration while maintaining steady breaths. Initially, start with 15-20 seconds and gradually increase the duration with practice.
- To release the pose, gently exhale and lower your chest, head, thighs, and feet back to the mat.
- Release your ankles and relax your legs, allowing them to extend straight or place them apart, whichever is comfortable.
- Rest in Makarasana (Crocodile Pose) or Child's Pose for a few breaths to relax and recover.
Note: It's important to practice Dhanurasana with proper alignment and under the guidance of a qualified yoga instructor, especially if you're a beginner or have any specific health concerns or injuries. Listen to your body and don't push beyond your limits.
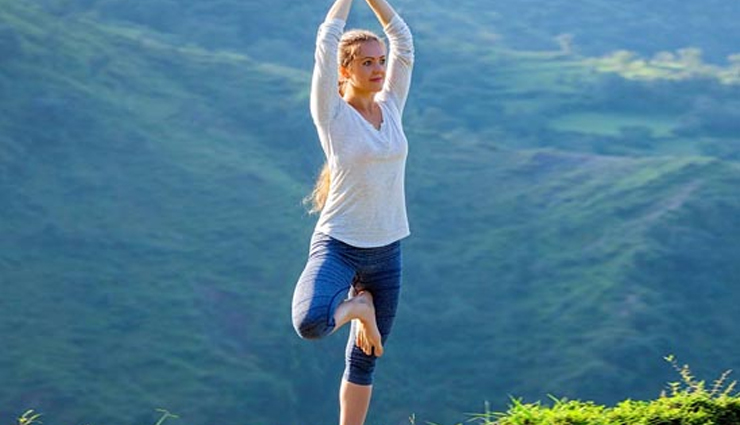
# Vrikshasana
Vrikshasana, also known as Tree Pose, is a standing yoga pose that focuses on balance and stability. Here are the steps to practice Vrikshasana:
- Begin by standing tall in Tadasana (Mountain Pose) with your feet hip-width apart and arms by your sides.
- Shift your weight onto your left foot and find your balance.
- Slowly bend your right knee and bring the sole of your right foot to the inner left thigh. If it's challenging to bring the foot to the thigh, you can place it on the calf or ankle, ensuring to avoid placing it on the knee joint.
- Once you have found your balance, bring your hands to the center of your chest in prayer position (Anjali Mudra).
- Find a focal point or a spot in front of you to gaze at, which will help with balance and concentration.
- Take a few deep breaths, grounding through your standing foot, and lengthening your spine.
- Engage your core muscles to maintain stability.
- If you feel steady, you can slowly raise your arms overhead, keeping them shoulder-width apart, palms facing each other, or join your palms together in prayer position above your head.
- Hold the pose, finding a comfortable balance, and continue to breathe deeply. Try to relax your shoulders and keep your gaze steady.
- Stay in the pose for 30 seconds to 1 minute, or as long as you feel comfortable.
- To release the pose, gently lower your arms to your sides, bring your right foot down to the floor, and return to standing in Tadasana.
- Repeat the same steps on the other side, shifting your weight onto your right foot and bringing your left foot to your inner right thigh.
Note: It's essential to practice Vrikshasana with proper alignment and balance. If you find it challenging to maintain stability, you can practice with the support of a wall or a chair. Always listen to your body, and avoid practicing if you have any knee or ankle injuries. It's advisable to learn and practice under the guidance of a qualified yoga instructor.
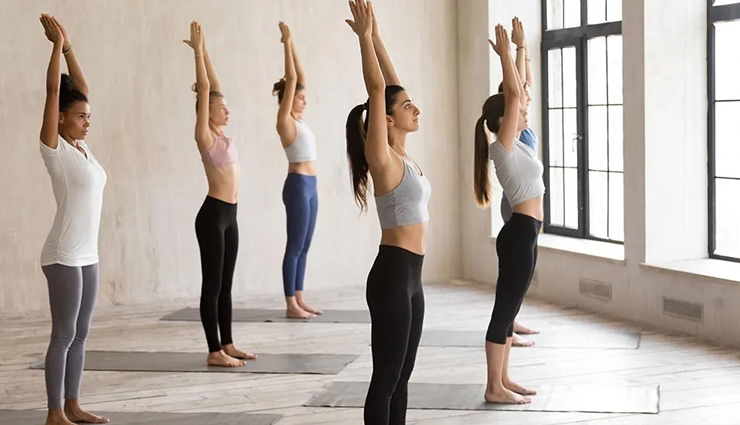
# Tadasana
Tadasana, also known as Mountain Pose, is a foundational standing posture in yoga. Here are the steps to practice Tadasana:
- Begin by standing tall with your feet together or hip-width apart, whichever feels more comfortable. Let your arms hang naturally by your sides.
- Distribute your weight evenly across both feet. Feel the four corners of your feet pressing into the ground: big toe mound, little toe mound, inner heel, and outer heel.
- Engage your thigh muscles by lifting your kneecaps slightly, without locking your knees. Keep your legs straight but not rigid.
- Lengthen your tailbone toward the floor, creating a neutral pelvis. Draw your lower abdomen gently in and up to support your lower back.
- Lift through the crown of your head, lengthening your spine. Imagine a string pulling you upward from the top of your head.
- Roll your shoulders back and down, opening your chest. Allow your shoulder blades to relax downward.
- Soften your facial muscles, including your jaw, and keep your gaze forward. You can choose a point in front of you to focus on.
- Take slow, deep breaths, allowing your body to feel grounded and steady. Maintain a sense of balance and stability.
- Stay in Tadasana for 30 seconds to 1 minute, or as long as it feels comfortable for you.
- To release the pose, gently lower your arms by your sides and step or relax out of the stance.
Tadasana is a simple yet powerful pose for improving posture, developing body awareness, and finding a sense of stability. It can be practiced on its own or as a starting point for other standing poses. Remember to listen to your body, make any necessary adjustments for your comfort, and seek guidance from a qualified yoga instructor if needed.
# Shalabasana
Shalabasana, also known as Locust Pose, is a yoga asana that strengthens the back muscles and improves posture. Here are the steps to practice Shalabasana:
- Start by lying down on your stomach (prone position) on a comfortable yoga mat or a soft surface.
- Place your arms alongside your body, with your palms facing downward and your forehead resting on the mat.
- Take a deep breath in, and as you exhale, engage your core muscles and begin to lift your legs off the mat.
- Keep your legs straight and together, and actively press your pubic bone into the mat for stability.
- As you continue to breathe, lift your upper body off the mat by simultaneously raising your head, chest, and shoulders. Maintain a gentle gaze forward.
- Reach your arms backward, alongside your body, with your palms facing upward. Keep your shoulders relaxed and away from your ears.
- Focus on lengthening your spine and lifting through your chest, while keeping your lower belly grounded.
- If comfortable, you can also lift your arms higher, reaching them toward your feet, to intensify the stretch and engagement of the back muscles.
- Hold the pose for several breaths, maintaining a steady rhythm of inhales and exhales. Start with 10-15 seconds and gradually increase the duration with practice.
- To release the pose, gently exhale and lower your legs, chest, and head back to the mat.
- Relax your arms alongside your body and turn your head to one side, allowing your entire body to rest.
Note: It's important to practice Shalabasana with proper alignment and listen to your body's limitations. If you have any existing back or neck injuries or conditions, it's advisable to consult a qualified yoga instructor before attempting this pose. Modify the pose as needed to suit your comfort level, and avoid straining or overexerting yourself.
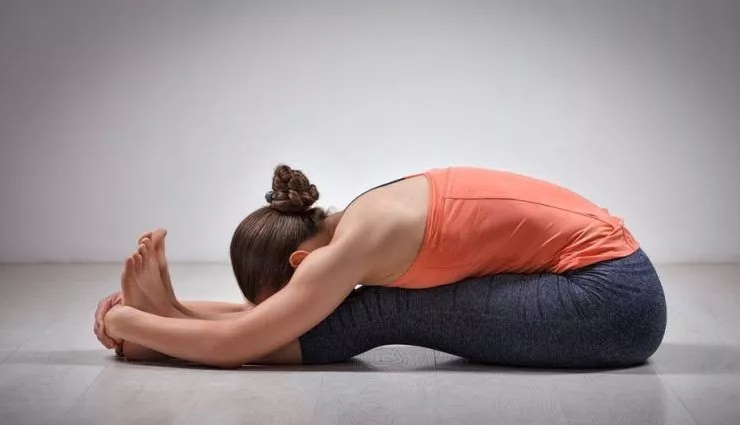
# Paschimottanasana
Paschimottanasana, also known as Seated Forward Bend or Intense Dorsal Stretch, is a seated yoga pose that provides a deep stretch to the back of the body. Here are the steps to practice Paschimottanasana:
- Start by sitting on a yoga mat with your legs extended in front of you. Keep your spine straight and shoulders relaxed.
- Take a deep breath in and lengthen your spine, reaching the crown of your head toward the ceiling.
- As you exhale, engage your core muscles and begin to hinge forward from your hips, leading with your chest.
- Keep your back straight as you fold forward, avoiding any rounding or collapsing of the spine. Imagine lengthening your torso over your legs.
- Reach your hands forward and grip your feet or ankles. If you can't reach them, you can use a yoga strap or towel around your feet, holding onto the ends to assist your forward fold.
- As you inhale, lengthen your spine and feel the stretch in the back of your legs and lower back.
- On each exhale, deepen the forward bend by gently relaxing your shoulders and allowing your body to move closer to your legs.
- Be mindful not to strain or force the stretch. The goal is to find a comfortable edge where you feel a good stretch without pain.
- Continue to breathe deeply and relax into the pose. With each exhale, try to release tension and sink a little deeper into the stretch.
- Hold the pose for 30 seconds to 1 minute, or as long as it feels comfortable for you. You can gradually increase the duration with practice.
- To release the pose, slowly engage your core and inhale as you lift your torso back up to a seated position.
- Take a moment to sit upright, breathing deeply, and observe the effects of the pose on your body.
Note: If you have tight hamstrings or lower back issues, you can bend your knees slightly or use props like blocks or blankets to support your forward fold. Avoid this pose if you have a recent back injury or pregnancy, and always practice within your own limitations. If you're new to yoga or have any concerns, it's recommended to practice under the guidance of a qualified yoga instructor.
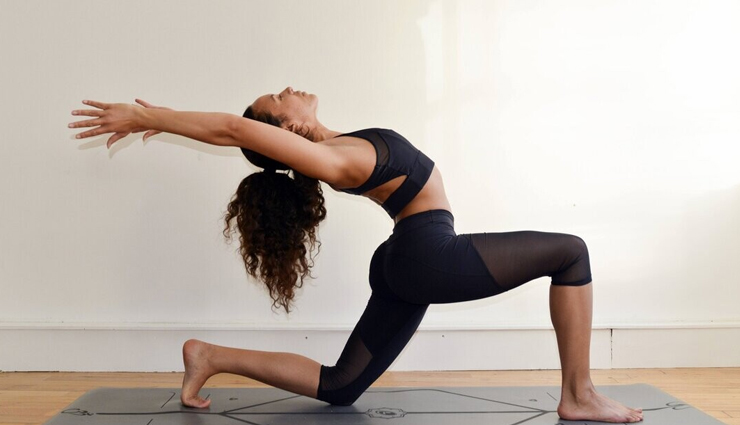
# Anjaneyasana
Anjaneyasana, also known as Low Lunge or Crescent Lunge, is a yoga asana that stretches the hip flexors, opens the chest, and strengthens the legs. Here are the steps to practice Anjaneyasana:
- Start by standing at the top of your mat in Tadasana (Mountain Pose).
- Step your right foot back, creating a long stance. Keep your left foot rooted firmly on the ground, with the knee directly over the ankle.
- Lower your right knee to the mat, gently placing it on the floor. You may fold your mat or use a blanket for knee support if needed.
- Extend your left foot forward, making sure it stays directly beneath your knee, forming a right angle with the left knee.
- As you inhale, lift your torso upright, stacking your shoulders over your hips. Engage your core muscles to maintain stability.
- Bring your hands to your left thigh for support. You can keep your hands on your thigh or reach them overhead, palms facing each other, for a deeper stretch.
- Relax your shoulders away from your ears and open your chest. Gently draw your tailbone down to lengthen your lower back.
- Sink deeper into the stretch by gently pressing your hips forward, feeling a gentle stretch in the front of your right hip and thigh.
- Keep your gaze forward and find a focal point to help with balance and concentration.
- Breathe deeply and hold the pose for 30 seconds to 1 minute, or as long as it feels comfortable for you.
- To release the pose, lower your hands back to your left thigh and slowly lift your right knee off the mat.
- Step your right foot forward to meet your left foot, returning to a standing position in Tadasana.
- Repeat the same steps on the other side, stepping your left foot back and sinking into the lunge with the right knee bent.
Note: If you have any knee issues or discomfort, you can place a folded blanket or a cushion under the knee for added support. It's important to listen to your body and practice within your comfort zone. If you have any concerns or are new to yoga, it's advisable to practice under the guidance of a qualified yoga instructor.