- Home›
- Healthy Living›
- 7 Must Try Exercises To Loose Belly Fat
7 Must Try Exercises To Loose Belly Fat
By: Priyanka Maheshwari Fri, 23 Feb 2024 10:58:14
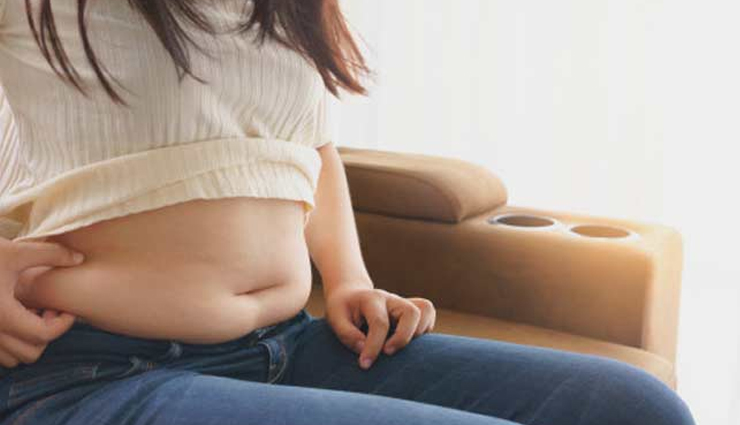
If you aim to reduce abdominal fat, integrating certain yoga poses into your daily regimen can be beneficial. These poses specifically target the flab around the abdomen, aiding in calorie burning, enhancing muscle flexibility, and boosting metabolism. Belly fat accumulation often stems from various factors such as age, genetics, unhealthy lifestyle choices, poor dietary habits, insufficient exercise, and stress. Additionally, weakened abdominal muscles can contribute to issues like lower back pain, posture problems, and sagging. By combining a nutritious diet with regular yoga practice, you can effectively combat belly fat. Consistency is key; adhering to your plan and performing yoga poses regularly is crucial. Numerous yoga poses are tailored for weight loss, particularly focusing on reducing belly fat.
The duration required to see noticeable reductions in belly fat through yoga varies depending on individual factors such as body composition, current fitness level, exercise routine, and the frequency, duration, and types of yoga poses practiced. Typically, results may become evident within a few weeks to several months.
Furthermore, incorporating just 20 minutes of daily yoga can be impactful, particularly for individuals who are currently inactive. Over time, this consistent practice can contribute to significant changes in weight and overall fitness levels.
Research indicates a concerning trend of increasing obesity rates, with percentages rising notably among both males and females in recent years.
Regardless of individual circumstances, starting with a manageable 20-minute daily yoga routine can lay the foundation for building essential muscle strength, flexibility, and stamina needed to progress further towards your fitness objectives.
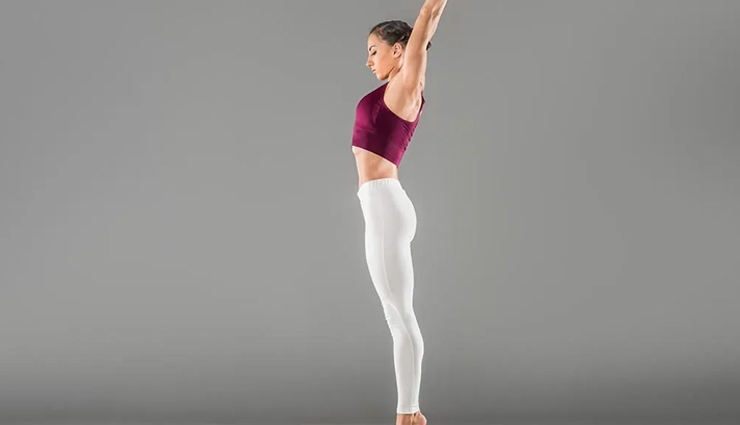
# Tadasana (Mountain Pose)
Tadasana, also known as the Mountain Pose in yoga, serves as a foundational posture that forms the basis of many other yoga poses. To practice Tadasana:
- Begin by standing tall with your feet together, ensuring that your weight is evenly distributed on both feet.
- Keep your spine straight, shoulders relaxed, and arms hanging naturally by your sides.
- Engage your thigh muscles and lift your kneecaps, while ensuring that your tailbone is tucked slightly.
- Lengthen through your torso and imagine a straight line extending from the crown of your head to the soles of your feet.
- Bring your palms together in front of your chest in a prayer position, or alternatively, let them hang alongside your body with your fingers gently extended.
- Focus your gaze softly ahead, fixing your eyes on a point in front of you.
- Breathe deeply and evenly, feeling the connection between your body and the earth beneath you.
- Hold the pose for several breaths, maintaining a sense of groundedness and stability.
Tadasana helps improve posture, strengthens the thighs, knees, and ankles, tones the abdomen, and promotes overall body awareness. It is often used as a starting point for various standing poses in yoga sequences.
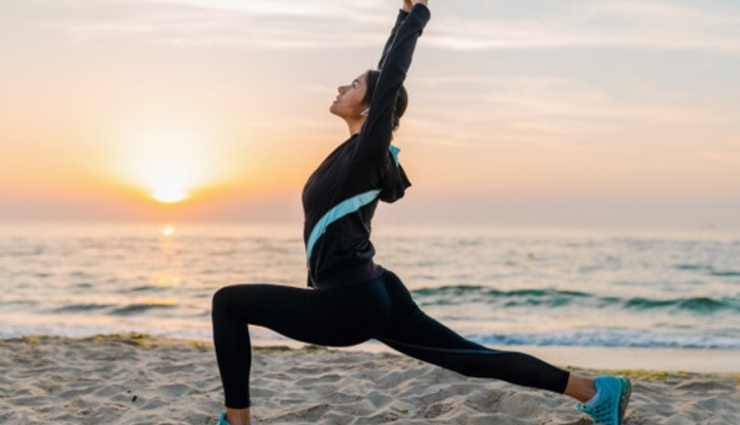
# Surya Namaskar (Sun Salutation)
Surya Namaskar, commonly known as the Sun Salutation, is a dynamic sequence of yoga postures that pay homage to the sun. It consists of a series of twelve gracefully linked asanas or poses, performed in a flowing sequence. Here's a step-by-step guide to practicing Surya Namaskar:
- Pranamasana (Prayer Pose): Stand at the front of your mat with your feet together and palms pressed together in front of your chest. Take a moment to center yourself and set your intention for the practice.
- Hasta Uttanasana (Raised Arms Pose): Inhale deeply as you lift your arms overhead, stretching upward and arching slightly backward, while keeping your gaze upward or forward.
- Uttanasana (Standing Forward Bend): Exhale as you hinge at the hips, folding forward from the waist. Keep your spine long and chest open as you reach your hands toward the floor or your shins. You can bend your knees if needed.
- Ashwa Sanchalanasana (Equestrian Pose): Inhale and step your right foot back into a lunge position, keeping your left knee bent and your hands framing your left foot. Lift your chest and gaze forward.
- Adho Mukha Svanasana (Downward Facing Dog Pose): Exhale as you step your left foot back to meet your right, coming into a high plank position. Then, lift your hips up and back, forming an inverted V shape with your body. Press your palms into the mat and lengthen your spine.
- Ashtanga Namaskara (Eight-Limbed Pose): Lower your knees, chest, and chin to the mat, keeping your hips lifted slightly. Your elbows should hug close to your body.
- Bhujangasana (Cobra Pose): Inhale as you slide forward and upward, arching your back and lifting your chest off the mat. Keep your shoulders relaxed and elbows slightly bent.
- Adho Mukha Svanasana (Downward Facing Dog Pose): Exhale and lift your hips back up into Downward Facing Dog.
- Ashwa Sanchalanasana (Equestrian Pose): Inhale and step your right foot forward between your hands, returning to the lunge position.
- Uttanasana (Standing Forward Bend): Exhale and step your left foot forward to meet your right, folding forward at the hips with your hands reaching toward the floor or shins.
- Hasta Uttanasana (Raised Arms Pose): Inhale as you sweep your arms out to the sides and then up overhead, arching slightly backward and lengthening your spine.
- Pranamasana (Prayer Pose): Exhale as you bring your palms together in front of your chest, returning to the starting position.
Repeat the sequence, leading with the left foot in steps 4 and 9, to complete one full round of Surya Namaskar. Practice several rounds, syncing your breath with each movement, to experience the full benefits of this energizing and invigorating yoga sequence. Surya Namaskar improves flexibility, strengthens muscles, boosts circulation, and calms the mind.
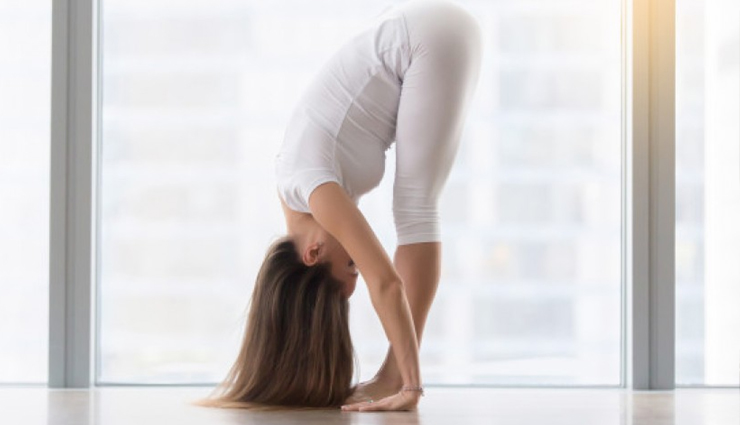
# Padahastasana (Standing Forward Bend)
Padahastasana, also known as Standing Forward Bend, is a yoga pose that provides a deep stretch to the entire back side of the body, particularly the hamstrings and lower back. Here's how to practice Padahastasana:
- Starting Position: Begin by standing tall at the front of your mat with your feet together or hip-width apart, depending on your comfort level. Ensure that your weight is evenly distributed on both feet.
- Mountain Pose (Tadasana): Inhale deeply and lift your arms overhead, stretching upwards and lengthening your spine.
- Forward Fold: Exhale slowly as you hinge forward at the hips, keeping your spine long and chest open. Allow your torso to fold forward over your legs, leading with your heart. Engage your quadriceps to activate your thighs.
- Hand Placement: Bring your hands down towards the floor or grasp the back of your ankles, depending on your flexibility. If you cannot reach the floor, you can bend your knees slightly or use yoga blocks for support.
- Head Position: Allow your head to hang heavy, releasing any tension in your neck. If comfortable, you can gently shake your head from side to side to further release tension.
- Relaxation: Surrender to the pose, breathing deeply and allowing gravity to gradually deepen the stretch. Feel the lengthening of the spine and the opening of the back body.
- Hold: Remain in the pose for 30 seconds to 1 minute, breathing deeply and relaxing into the stretch.
- Release: To come out of the pose, engage your core muscles and slowly begin to lift your torso back up to a standing position, vertebra by vertebra. Keep your head and neck relaxed as you return to an upright position.
- Mountain Pose (Tadasana): Once fully upright, bring your arms down by your sides and return to the Mountain Pose, standing tall and grounded.
Padahastasana stretches the entire back body, including the spine, hamstrings, and calves. It also improves circulation, relieves stress, and calms the mind. Avoid this pose if you have a back injury or high blood pressure. As with any yoga pose, listen to your body and modify as needed to ensure a safe and comfortable practice.
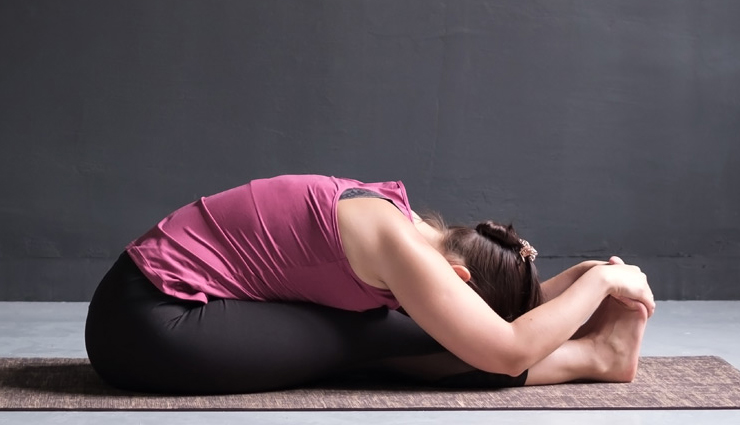
# Paschimottanasana (Seated Forward Bend)
Paschimottanasana, also known as Seated Forward Bend, is a yoga pose that provides a deep stretch to the entire back side of the body, particularly the spine, hamstrings, and calves. Here's how to practice Paschimottanasana:
- Starting Position: Begin by sitting on the floor with your legs extended straight in front of you. Sit up tall, lengthening your spine, and flex your feet so that your toes point towards the ceiling.
- Mountain Pose (Dandasana): Inhale deeply and engage your quadriceps to lift your kneecaps. Press your thighs firmly into the mat.
- Arm Position: Raise your arms overhead as you inhale, lengthening your spine even more. Keep your shoulders relaxed and away from your ears.
- Forward Fold: Exhale slowly as you hinge forward at the hips, leading with your heart. Keep your back flat as you fold forward, reaching your hands towards your feet. If you cannot reach your feet, you can hold onto your shins, ankles, or use a yoga strap around the soles of your feet for assistance.
- Hand Placement: Hold onto your feet, ankles, shins, or use a yoga strap, depending on your flexibility. Focus on lengthening your spine with each inhalation and deepening the forward bend with each exhalation.
- Head Position: Relax your head and neck, allowing your forehead to move towards your legs. Avoid tensing your neck or shoulders.
- Relaxation: Surrender to the pose, breathing deeply and allowing gravity to gradually deepen the stretch. Relax your entire body and release any tension you may be holding.
- Hold: Remain in the pose for 30 seconds to 1 minute, breathing deeply and relaxing into the stretch. With consistent practice, you may be able to hold the pose for longer durations.
- Release: To come out of the pose, engage your core muscles and slowly begin to lift your torso back up to a seated position, vertebra by vertebra. Keep your head and neck relaxed as you return to an upright position.
- Rest: Once fully upright, take a moment to rest and observe the effects of the pose on your body. You can shake out your legs or gently massage your hamstrings to release any tension.
Paschimottanasana stretches the entire back side of the body, stimulates the digestive organs, and calms the mind. It is also believed to improve flexibility and relieve stress and anxiety. Avoid this pose if you have a back injury or hamstring strain. As with any yoga pose, listen to your body and modify as needed to ensure a safe and comfortable practice.

# Pavanamuktasana (Wind Relieving Pose)
Pavanamuktasana, commonly known as the Wind Relieving Pose, is a yoga asana that helps to relieve gas and bloating in the abdomen while also strengthening the core muscles. Here's how to practice Pavanamuktasana:
- Starting Position: Begin by lying flat on your back on a yoga mat with your legs extended and arms resting alongside your body. Ensure your spine is straight and your neck is aligned with your spine.
- Leg Lift: As you inhale, bend your knees and bring them towards your chest. Keep your ankles together and your feet flexed.
- Knee Hug: Exhale and wrap your arms around your bent knees, clasping your hands together or holding onto your shins. Keep your shoulders relaxed and your head on the mat.
- Gentle Compression: As you continue to exhale, gently hug your knees towards your chest, applying light pressure to your abdomen. This compression helps to massage the internal organs, aiding in digestion and relieving gas.
- Hold: Hold the pose for several breaths, allowing yourself to relax and soften into the posture. Focus on breathing deeply and evenly, feeling the gentle release of tension in your abdomen.
- Extended Leg Option: For a deeper stretch, you can extend one leg while keeping the other knee hugged towards your chest. Hold for a few breaths, then switch sides to stretch the other leg.
- Release: Release the pose by slowly lowering your feet back down to the mat and extending your legs fully. Take a moment to rest in Savasana (Corpse Pose) to allow your body to integrate the benefits of the posture.
Pavanamuktasana helps to stimulate the digestive system, relieve constipation, and alleviate discomfort caused by gas and bloating. It also strengthens the abdominal muscles and improves flexibility in the hips and lower back. Practice this pose regularly, particularly after meals or whenever you feel bloated, to experience its therapeutic effects. As with any yoga practice, listen to your body and modify the pose as needed to suit your individual needs and abilities.
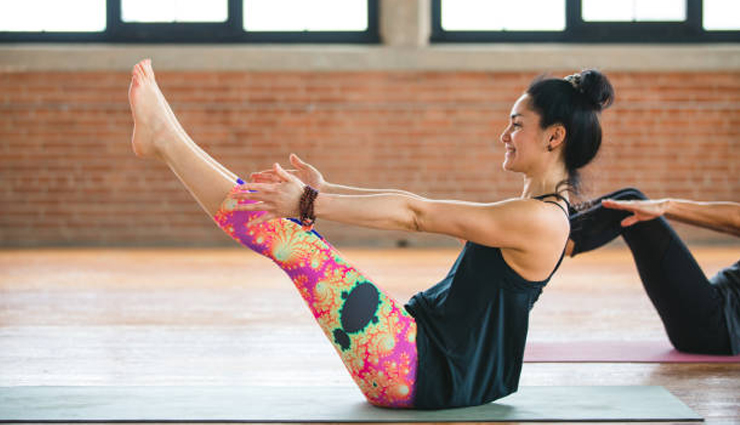
# Naukasana (Boat Pose)
Naukasana, commonly referred to as Boat Pose, is a yoga asana that strengthens the core muscles, improves balance, and stimulates the abdominal organs. Here's how to practice Naukasana:
- Starting Position: Begin by sitting on the yoga mat with your legs extended in front of you. Keep your spine straight and your hands resting beside your hips.
- Lift Your Legs: Inhale deeply and lean back slightly while lifting your legs off the mat. Keep your legs together and extend them out straight so that your body forms a V shape.
- Arm Position: Extend your arms forward in line with your shoulders, parallel to the floor. Keep your palms facing each other, or you can hold onto the backs of your thighs for support if needed.
- Balance: Engage your core muscles to maintain your balance in the pose. Keep your chest lifted and your spine straight, avoiding rounding or collapsing in the upper back.
- Gaze: Fix your gaze towards your toes, keeping your neck long and relaxed. This helps to maintain focus and stability in the pose.
- Breathing: Breathe deeply and evenly as you hold the pose, maintaining a steady rhythm of inhalation and exhalation.
- Hold: Hold the pose for 10 to 30 seconds, gradually increasing the duration as you build strength and endurance. Keep your breath steady and your mind focused throughout the pose.
- Release: Exhale as you gently lower your legs and torso back down to the mat, returning to the starting position. Take a moment to rest and relax in Corpse Pose (Savasana) before moving on to the next posture.
Naukasana strengthens the abdominal muscles, hip flexors, and spine while also improving digestion and relieving stress. Regular practice of this pose can help to tone the core and increase overall body awareness. Avoid this pose if you have a recent abdominal injury, hernia, or if you are pregnant. As with any yoga practice, listen to your body and modify the pose as needed to suit your individual needs and abilities.
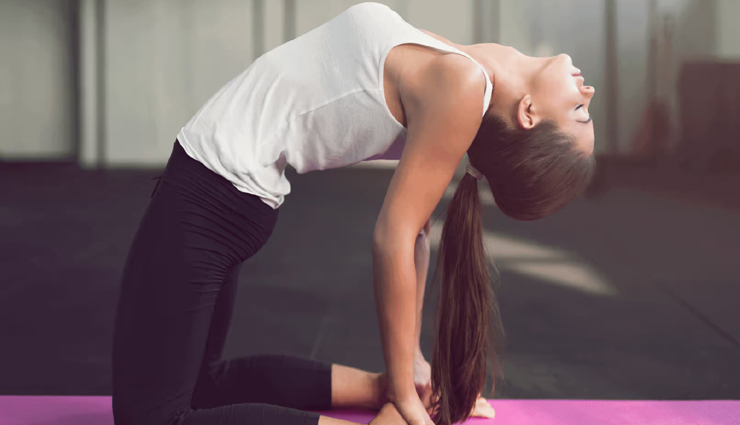
# Ustrasana (Camel Pose)
Ustrasana, also known as Camel Pose, is a yoga asana that stretches the front of the body, particularly the chest, abdomen, and hip flexors, while also strengthening the back muscles. Here's how to practice Ustrasana:
- Starting Position: Begin by kneeling on the yoga mat with your knees hip-width apart. Ensure that your thighs are perpendicular to the floor and that your shins are pressing firmly into the mat.
- Hand Placement: Place your hands on your hips, with your fingers pointing downwards and your thumbs resting on your sacrum (the triangular bone at the base of your spine).
- Engage Your Core: Inhale deeply and engage your core muscles by drawing your navel towards your spine. This will help to stabilize your lower back and pelvis.
- Arch Your Back: As you exhale, begin to arch your back and lean back slowly. Keep your chin tucked slightly towards your chest to lengthen the back of your neck.
- Reach Your Hands: Reach your hands back, one at a time, to grasp your heels. If you cannot reach your heels, you can place your hands on your lower back for support.
- Open Your Chest: Press your hips forward and lift your chest towards the ceiling, creating a deep arch in your back. Keep your shoulders relaxed and down away from your ears.
- Gaze: Keep your gaze soft and either look straight ahead or gently tilt your head back to look towards the ceiling, depending on your comfort level.
- Breathing: Take slow, deep breaths as you hold the pose, allowing the breath to flow freely through your body. Stay in the pose for 20 to 30 seconds, or longer if comfortable.
- Release: To come out of the pose, release your hands from your heels and slowly bring your torso back to an upright position. Sit back on your heels and take a moment to rest in Child's Pose (Balasana) or Corpse Pose (Savasana) to counterpose.
Ustrasana helps to improve posture, increase flexibility in the spine and hip flexors, and stimulate the digestive organs. It can also be therapeutic for relieving back pain and fatigue. Avoid this pose if you have a recent neck or back injury, or if you experience discomfort in your knees or ankles. As with any yoga practice, listen to your body and modify the pose as needed to suit your individual needs and abilities.