- Home›
- Healthy Living›
- International Yoga Day 2023- 5 Yoga Asanas That Will Help You Boost Memory Naturally
International Yoga Day 2023- 5 Yoga Asanas That Will Help You Boost Memory Naturally
By: Pinki Mon, 19 June 2023 8:00:36
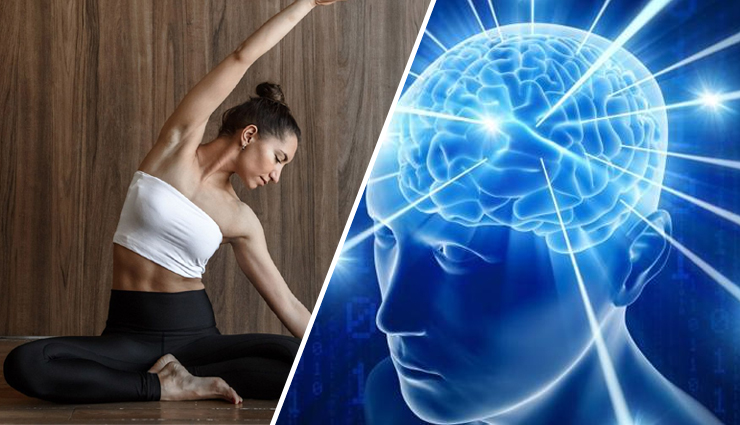
Yoga, an ancient practice originating from India, not only promotes physical strength and flexibility but also offers a myriad of benefits for the mind and memory. Incorporating yoga into your daily routine can enhance cognitive function, improve concentration, and boost memory retention. By combining physical postures, breath control, meditation, and mindfulness, yoga provides a holistic approach to enhancing memory and overall mental well-being.
The practice of yoga engages both the body and mind, creating a harmonious connection that positively impacts memory. Here are some ways in which yoga can help boost memory:
- Increased Blood Flow to the Brain
Yoga postures, or asanas, involve various body positions that stretch and compress different parts of the body. These movements increase blood circulation, including to the brain, delivering oxygen and vital nutrients that support optimal brain function. Improved blood flow enhances memory and cognitive abilities.
- Stress Reduction
Chronic stress can impair memory and cognitive processes. Yoga incorporates relaxation techniques, deep breathing, and meditation, which help reduce stress and promote a calm state of mind. By reducing stress levels, yoga helps enhance memory recall and mental clarity.
- Mindfulness and Focus
Yoga emphasizes being fully present in the moment, cultivating mindfulness and enhancing focus. By practicing mindfulness during yoga sessions, you train your mind to concentrate on the present, which translates into improved focus and attention in daily life. This heightened focus positively impacts memory retention and recall.
- Balancing the Nervous System
Yoga includes practices that balance the sympathetic and parasympathetic nervous systems. When these systems are in balance, it supports optimal brain function and memory. Yoga poses, such as inversions, stimulate the parasympathetic nervous system, promoting relaxation and rejuvenation.
- Meditation for Memory Enhancement
Yoga often incorporates meditation, which has been scientifically proven to enhance memory. Regular meditation practice can increase gray matter in the brain, particularly in areas associated with memory and cognitive function. By including meditation in your yoga routine, you can strengthen your memory and cognitive abilities.
Remember, consistency is key when practicing yoga for memory enhancement. By incorporating yoga into your daily routine, you can experience the benefits of improved blood flow, reduced stress, enhanced focus, and a balanced nervous system—all of which contribute to boosting memory and overall mental well-being.

# Padmasana
Padmasana, also known as Lotus Pose, is a seated posture commonly practiced in yoga and meditation. It is characterized by the crossing of the legs and is often associated with a sense of calm and tranquility. Here's a step-by-step guide on how to do Padmasana:
- Find a comfortable and quiet space: Choose a clean and peaceful area where you can sit undisturbed for a few minutes.
- Sit on the floor or on a yoga mat: Begin by sitting with your legs stretched out in front of you.
- Bend your right knee: Lift your right leg and bring your right foot up to rest on your left thigh. The sole of your right foot should face upward, and your right heel should be close to your navel.
- Bend your left knee: Now, take your left leg and place your left foot on your right thigh. The sole of your left foot should also face upward, and your left heel should be close to your navel. Both knees should touch the ground.
- Lengthen your spine: Sit with an erect spine, keeping your back straight and your shoulders relaxed. This helps maintain proper alignment and allows for comfortable breathing.
- Find a comfortable hand position: Place your hands on your knees, either with your palms facing up in a gesture of openness or with your palms facing downward for grounding energy. Alternatively, you can adopt a mudra (hand gesture) of your choice, such as Chin Mudra (thumb and index finger touching) or Dhyana Mudra (hands resting on your lap, right hand over the left, with the thumbs gently touching).
- Relax your body: Release any tension in your body and allow yourself to relax. Soften your facial muscles, close your eyes gently, and focus on your breath.
- Hold the pose: Stay in Padmasana for a few minutes, gradually increasing the duration as you become more comfortable. It's essential to listen to your body and avoid pushing beyond your limits. Remember, the pose should be comfortable and stable, not painful.
- Release the pose: To come out of Padmasana, gently uncross your legs and extend them in front of you. Shake your legs out to release any tension.
Note: If you find it challenging to perform Padmasana with both legs crossed, you can start with a modified version by placing one foot on the opposite thigh and the other foot on the ground in half lotus position. Over time, you can work towards achieving the full Padmasana.
It's important to approach Padmasana with patience and respect for your body's limitations. If you have any knee or hip injuries, it's advisable to seek guidance from a qualified yoga teacher or healthcare professional before attempting this pose.
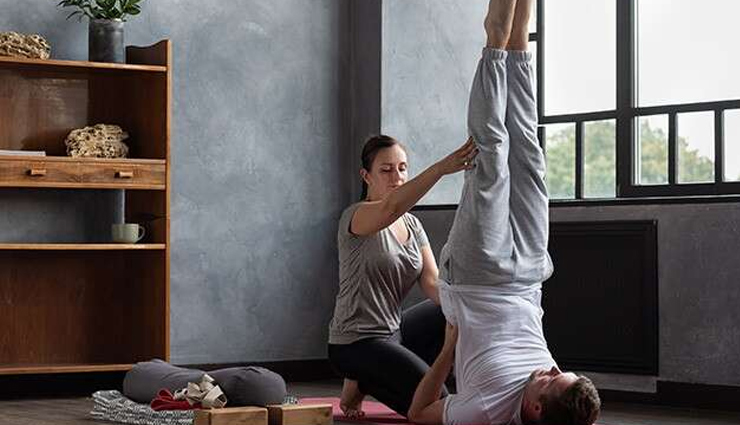
# Sarvangasana
Sarvangasana, also known as Shoulder Stand, is a powerful inversion pose in yoga that offers numerous benefits for the body and mind. It involves balancing on your shoulders with your legs extended vertically. Here's a step-by-step guide on how to do Sarvangasana:
- Preparation: Find a clear, open space with a yoga mat or a soft surface to practice on. It's best to perform Sarvangasana on an empty stomach, so allow a gap of at least 2-3 hours after a meal.
- Lie down on your back: Start by lying flat on your back, arms resting alongside your body, palms facing down. Relax your entire body and take a few deep breaths to center yourself.
- Bend your knees and lift your legs: Slowly bend your knees, bringing them toward your chest. Use your abdominal muscles to lift your legs off the floor, keeping your thighs perpendicular to the ground. Support your hips and lower back with your hands to provide stability.
- Straighten your legs upward: As you continue to lift your legs, straighten them upward, aiming to create a straight line from your feet to your hips. Keep your toes pointed and engage your leg muscles to maintain stability.
- Support your lower back: Gently walk your hands up your back, placing them on your mid to lower back for support. Your elbows should be shoulder-width apart, and your forearms should be pressing into the ground. Adjust your hands and elbows as needed to find a comfortable and supportive position.
- Lift your hips off the floor: Pressing your hands and arms firmly into the ground, lift your hips and buttocks off the floor. As you do this, continue to straighten your legs until your body forms a vertical line from your shoulders to your toes. Your weight should be on your shoulders and upper arms, not your neck.
- Maintain the pose and breathe: Once you're in the full Sarvangasana position, relax your neck and gaze toward your chest. Keep your breath smooth and steady, focusing on deep inhalations and exhalations.
- Hold the pose: Start by holding Sarvangasana for 30 seconds to 1 minute, gradually increasing the duration as you gain strength and comfort in the pose. Aim to work up to 3-5 minutes over time.
- Exit the pose with control: To come out of Sarvangasana, slowly lower your legs back down to the ground, maintaining control and engaging your core muscles. Release your hands from your lower back and gently roll your spine down, one vertebra at a time, until your entire back is resting on the mat. Take a moment to rest in Savasana (Corpse Pose) and observe the effects of the pose on your body and mind.
Important Note: Sarvangasana is an intermediate to advanced yoga pose that requires strength, flexibility, and proper alignment. If you're new to this pose or have any neck or shoulder issues, it's advisable to seek guidance from a qualified yoga teacher before attempting it. They can provide modifications or alternatives to ensure your safety and maximize the benefits of the pose.

# Paschimottanasana
Paschimottanasana, also known as Seated Forward Bend or Intense Dorsal Stretch, is a seated yoga pose that provides a deep stretch for the entire backside of the body, including the spine, hamstrings, and calves. Here's a step-by-step guide on how to do Paschimottanasana:
- Start in a seated position: Sit on a yoga mat with your legs extended in front of you. Keep your spine erect and your legs together. Place your hands on the mat beside your hips, fingers pointing forward.
- Engage your core and lengthen your spine: Draw your navel toward your spine to engage your core muscles. As you do so, imagine your spine lengthening, creating space between each vertebra.
- Inhale and raise your arms: On an inhale, raise your arms overhead, lengthening your spine even further. Feel the stretch from your tailbone to the tips of your fingers.
- Exhale and fold forward: On an exhale, begin to fold forward from your hips, leading with your chest. Keep your spine long as you fold, maintaining the length in your back.
- Reach for your feet or ankles: Continue to fold forward until you reach a comfortable edge. Extend your arms toward your feet and reach for your toes or hold onto your ankles, shins, or wherever your hands can comfortably reach.
- Relax and deepen the stretch: As you hold the pose, allow your breath to deepen and relax into the stretch. With each inhalation, feel the lengthening of your spine, and with each exhalation, sink a little deeper into the stretch.
- Maintain proper alignment: Keep your legs active and toes flexed toward your face. Ensure that your knees are straight but not locked. If you have tight hamstrings, you can slightly bend your knees to ease the stretch.
- Focus on the breath: Stay in Paschimottanasana for 5-10 breaths, or longer if comfortable. Use each breath to deepen the stretch and release any tension or tightness in the body.
- Release the pose: To come out of the pose, engage your core muscles and slowly lift your torso back up, leading with your chest. Return to a seated position with your legs extended.
Important Note: Paschimottanasana requires flexibility in the hamstrings and lower back. If you have any lower back issues or tightness, it's essential to approach this pose with caution. Do not force yourself into a deep forward bend if it causes pain or discomfort. Gradually work on the pose over time, focusing on maintaining proper alignment and listening to your body's limits. If necessary, use props like a folded blanket or bolster to support your torso and make the pose more accessible. It's always advisable to practice under the guidance of a qualified yoga teacher to ensure proper form and prevent injuries.

# Padahastasana
Padahastasana, also known as Standing Forward Bend or Hand-to-Foot Pose, is a yoga asana that provides a deep stretch for the back of the legs, spine, and shoulders. Here's a step-by-step guide on how to do Padahastasana:
- Start in Tadasana (Mountain Pose): Stand tall with your feet hip-width apart, toes pointing forward, and arms resting alongside your body. Distribute your weight evenly through your feet, grounding down into the floor.
- Engage your core and lengthen your spine: Draw your navel toward your spine to engage your core muscles. Imagine your spine lengthening, creating space between each vertebra. Roll your shoulders back and down, opening your chest.
- Inhale and raise your arms overhead: On an inhale, lift your arms up alongside your ears, keeping them straight and reaching upward. Lengthen your spine even more as you do this.
- Exhale and fold forward: On an exhale, hinge forward at your hips, leading with your chest. Keep your spine long as you fold, maintaining the length in your back. Bend your knees slightly if necessary to ease the stretch on your hamstrings.
- Reach for your feet or ankles: As you fold forward, allow your arms to hang down toward the floor. Depending on your flexibility, reach for your feet, ankles, or the back of your legs. If you can't reach your feet, you can use yoga blocks or a strap to assist you in reaching.
- Relax and deepen the stretch: Once you have reached a comfortable position, relax into the pose and allow gravity to gently deepen the stretch. With each exhale, relax your body a little more and surrender to the stretch.
- Maintain proper alignment: Keep your legs active and grounded into the floor. If possible, straighten your legs and draw your kneecaps up to engage your quadriceps. Keep your neck relaxed and let your head hang, releasing any tension in your neck and shoulders.
- Focus on the breath: Stay in Padahastasana for 5-10 breaths, or longer if comfortable. With each inhalation, lengthen your spine, and with each exhalation, deepen your forward bend.
- Release the pose: To come out of the pose, engage your core muscles and slowly lift your torso back up, leading with your chest. Keep your spine long as you return to a standing position.
Important Note: Padahastasana requires flexibility in the hamstrings and the back of the legs. If you have any lower back issues or tightness, it's important to approach this pose with caution. Do not force yourself into a deep forward bend if it causes pain or discomfort. Gradually work on the pose over time, focusing on maintaining proper alignment and listening to your body's limits. If necessary, bend your knees slightly or use props like yoga blocks or a strap to make the pose more accessible. It's always advisable to practice under the guidance of a qualified yoga teacher to ensure proper form and prevent injuries.
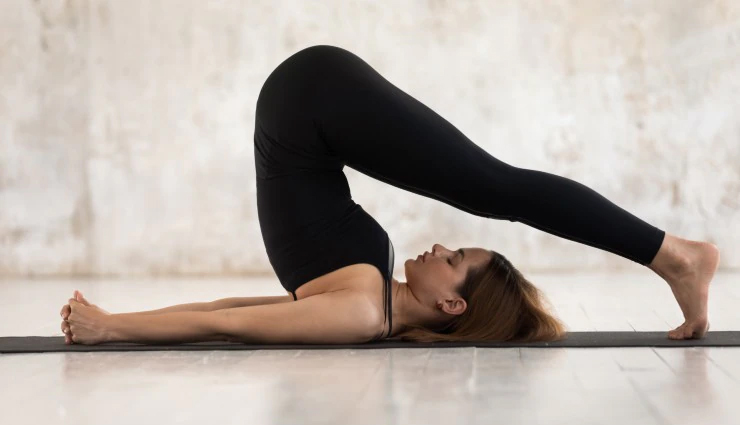
# Halasana
Halasana, also known as Plow Pose, is an inverted yoga posture that provides a deep stretch for the back of the body, particularly the spine, shoulders, and hamstrings. Here's a step-by-step guide on how to do Halasana:
- Start by lying flat on your back: Lie down on a yoga mat with your arms alongside your body, palms facing down. Keep your legs together and extend them straight out in front of you.
- Engage your core and lift your legs: On an inhalation, engage your core muscles and lift your legs off the ground, keeping them together. Use your abdominal strength to bring your legs up and overhead, aiming to touch your toes to the floor behind your head.
- Support your back: Once your legs are lifted, place your hands on your lower back for support. Keep your elbows on the ground and your forearms pressing into the mat.
- Lengthen your spine and relax your shoulders: With your hands supporting your back, lengthen your spine as much as possible. Allow your shoulders to relax and draw away from your ears. This will help create space and prevent strain in your neck and upper back.
- Straighten your legs and bring your toes to the floor: Slowly straighten your legs as much as possible, aiming to bring your toes to touch the floor behind your head. If your toes don't reach the floor, that's okay. Just go as far as is comfortable for you.
- Maintain the pose and breathe: Once you are in the full expression of Halasana, relax into the pose and focus on your breath. Take slow, deep breaths, allowing the stretch to deepen with each exhalation.
- Hold the pose: Stay in Halasana for 5-10 breaths, or longer if you are comfortable. As you hold the pose, try to maintain a sense of relaxation and surrender, allowing gravity to gently deepen the stretch.
- Release the pose: To come out of Halasana, bend your knees and slowly roll your spine down, one vertebra at a time, until your entire back is resting on the mat. Keep your legs together and lower them to the ground. Take a moment to rest in Savasana (Corpse Pose) and observe the effects of the pose on your body and mind.
Important Note: Halasana is an intermediate to advanced yoga pose that requires flexibility in the spine, shoulders, and hamstrings. If you have any neck, shoulder, or back injuries, it's important to approach this pose with caution or avoid it altogether. It's advisable to practice under the guidance of a qualified yoga teacher who can provide proper alignment cues and modifications based on your individual needs.


