- Home›
- Healthy Living›
- International Yoga Day 2023- 4 Yoga Poses That Will Help You Fix Drooping Shoulders
International Yoga Day 2023- 4 Yoga Poses That Will Help You Fix Drooping Shoulders
By: Pinki Tue, 20 June 2023 1:13:54

Drooping shoulders, also known as rounded shoulders or slouched posture, refer to the condition where the shoulders roll forward, causing the upper back to curve and the chest to collapse inward. This postural issue is commonly associated with poor alignment, muscle imbalances, and habitual patterns of sitting or standing.
Drooping shoulders can result from a variety of factors, including excessive sitting, prolonged desk work, sedentary lifestyles, improper lifting techniques, weak back and shoulder muscles, and muscular tightness in the chest and front of the shoulders. It can also be influenced by psychological factors, such as stress and low self-esteem, which may cause individuals to hunch forward as a way of protecting themselves or closing themselves off from their surroundings.
The consequences of drooping shoulders can extend beyond mere aesthetics. It can lead to a range of physical problems, including neck and shoulder pain, headaches, reduced mobility in the upper body, and compromised breathing patterns. Additionally, this posture can affect one's self-confidence and body language, conveying a lack of openness and vitality.
Addressing drooping shoulders involves a multifaceted approach. It typically includes exercises to strengthen the weak muscles in the upper back, neck, and shoulders while stretching the tight muscles in the chest and front of the shoulders. Building awareness of proper posture and making ergonomic adjustments in daily activities can also contribute to correcting this issue.
It's important to note that each individual's situation may differ, and it's advisable to consult with a healthcare professional, physical therapist, or qualified fitness instructor to receive personalized guidance and a tailored plan to address drooping shoulders effectively. By adopting corrective measures and incorporating regular exercises and postural awareness into one's routine, it is possible to improve posture, relieve discomfort, and promote a more balanced and aligned upper body.
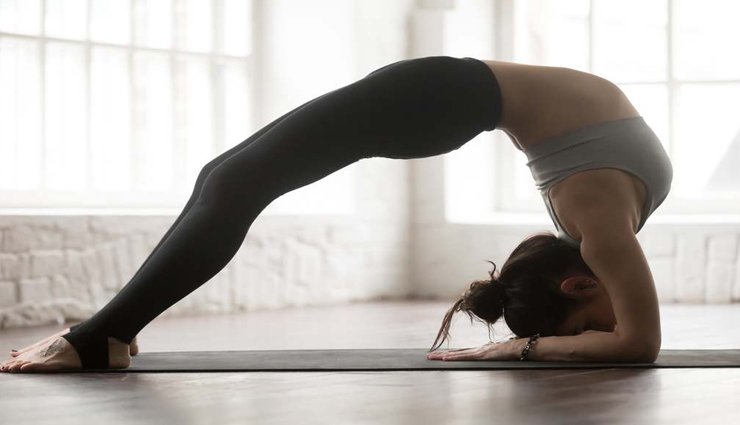
# Setu Bandha Sarvangasana
To perform Setu Bandha Sarvangasana, also known as Bridge Pose, follow these steps:
- Lie down on your back with your knees bent and feet flat on the floor. Keep your feet hip-width apart and place your arms alongside your body with palms facing down.
- Ensure that your feet are firmly planted on the ground, and your heels are as close to your sitting bones as possible.
- Inhale deeply, and as you exhale, press your feet into the floor, engaging your glutes and lifting your hips off the ground. Allow your tailbone and lower back to lift first, followed by the middle and upper back.
- Continue lifting your hips until your thighs and torso are in a straight line, creating a bridge shape with your body. Keep your chin slightly tucked in towards your chest to maintain a natural alignment of your neck.
- If it feels comfortable, you can clasp your hands underneath your pelvis and interlace your fingers, extending through the arms to help lift your chest higher.
- Relax your shoulders, jaw, and facial muscles while maintaining the pose. Breathe deeply and evenly.
- Hold the pose for 30 seconds to a minute, or longer if you're comfortable. Focus on maintaining a steady breath and feeling the stretch in your chest, shoulders, and thighs.
- To release the pose, slowly unclasp your hands if they were interlaced, and exhale as you gently roll your spine down to the floor, one vertebra at a time.
- Once your back is fully on the ground, extend your legs and allow your entire body to relax in Savasana (Corpse Pose) for a few breaths.
Note: Setu Bandha Sarvangasana should be avoided if you have a neck or shoulder injury, or if you are pregnant. Always listen to your body, and if you experience any pain or discomfort, ease out of the pose. It's a good idea to learn this pose under the guidance of a qualified yoga instructor to ensure proper alignment and modifications if needed.
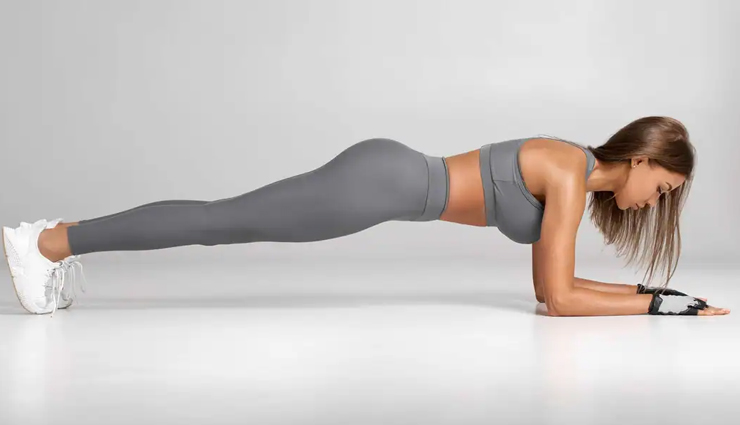
# Planks
To perform a basic plank exercise, follow these steps:
- Start by positioning yourself face down on an exercise mat or a comfortable surface. Place your forearms on the ground with your elbows directly under your shoulders.
- Extend your legs straight behind you, resting on the balls of your feet. Your body should form a straight line from your head to your heels.
- Engage your core muscles by drawing your navel in toward your spine. Keep your back flat and avoid sagging or arching your lower back.
- Maintain a neutral neck position by looking down at the floor, about a foot or so in front of your hands.
- Hold this position, ensuring that your body remains aligned and stable. Focus on keeping your core muscles engaged throughout the exercise.
- Breathe steadily and deeply while holding the plank. Aim to maintain the position for as long as you comfortably can, starting with 20-30 seconds and gradually increasing the duration as you get stronger.
- Once you're ready to finish, slowly lower your knees to the ground and rest in a kneeling position or transition to a resting position like Child's Pose.
Tips:
- Avoid raising your hips too high or letting them sag. Maintain a straight line from head to heels.
- Don't forget to breathe. Inhale and exhale deeply throughout the exercise.
- Start with shorter durations and gradually increase your hold time as you build strength and stability.
- If you experience discomfort or pain in your wrists, you can perform the exercise on your fists or use push-up handles to alleviate the pressure.
Remember, proper form is essential for getting the most out of planks while minimizing the risk of injury. If you're new to planks or have any underlying health concerns, it's advisable to consult with a fitness professional or instructor who can guide you through the exercise safely.
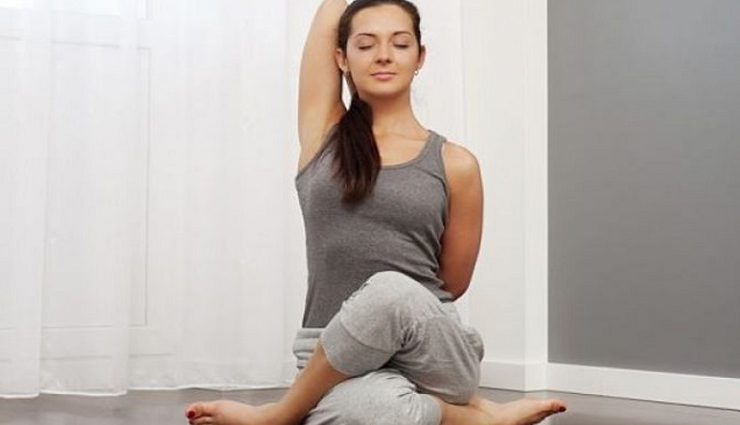
# Gomukhasana
To practice Gomukhasana, also known as Cow Face Pose, follow these steps:
- Begin by sitting on a yoga mat with your legs extended in front of you. Bend your knees and place your feet flat on the floor.
- Slide your left foot under your right leg and place it beside your right hip. Your left knee should point forward.
- Cross your right leg over your left leg, bringing your right foot to the outside of your left hip. Your right knee should stack directly over your left knee, with your right ankle beside your left hip.
- Adjust your sitting bones so that you're comfortably grounded and balanced on both sides.
- Inhale and elongate your spine. As you exhale, extend your left arm out to the side, parallel to the floor. Bend your left elbow and bring your left hand behind your back, palm facing your back.
- Reach your right arm up toward the ceiling, bending your elbow and bringing your right hand down behind your back. Try to interlock your fingers or use a strap to hold onto if your hands don't reach.
- If you cannot reach your hands or hold a strap, you can modify the pose by using a towel or gently holding onto your shirt.
- Relax your shoulders and ensure that your spine remains straight throughout the pose. You should feel a gentle stretch in your shoulders, chest, and upper arms.
- Stay in the pose for 30 seconds to a minute, breathing deeply and maintaining a relaxed yet focused state.
- To release the pose, gently unwind your legs and arms. Straighten both legs out in front of you and shake them out if needed.
- Repeat the same steps on the opposite side, crossing your left leg over your right and interlacing your arms in the opposite direction.
Tips:
- If your hips are tight, you can sit on a folded blanket or bolster to elevate your sitting bones and make the pose more accessible.
- If you experience any pain or discomfort in your knees, modify the pose by keeping your legs uncrossed and feet flat on the floor, focusing on the upper body stretch instead.
- It's important to listen to your body and not force the posture. Take it gradually and honor your limits.
As with any yoga pose, it's recommended to practice Gomukhasana under the guidance of a qualified yoga teacher, especially if you're new to the pose or have any specific concerns or limitations.
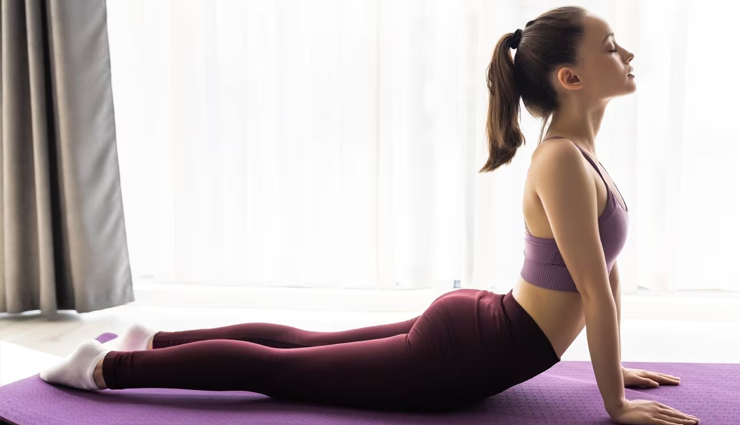
# Bhujangasana
To practice Bhujangasana, also known as Cobra Pose, follow these steps:
- Start by lying face down on a yoga mat or a comfortable surface. Stretch your legs straight back, tops of the feet resting on the mat.
- Place your hands on the mat, slightly below and beside your shoulders, with your fingers pointing forward. Keep your elbows close to your body.
- Press your pubic bone and the tops of your feet firmly into the mat. Engage your leg muscles and gently lift your head, chest, and upper abdomen off the mat, while keeping your pelvis grounded.
- As you inhale, begin to straighten your arms and lift your chest further off the ground. Draw your shoulder blades down and back, opening up your chest and expanding through the collarbones.
- Keep your gaze forward, or if it feels comfortable, you can tilt your head back and look upward, lengthening your neck.
- Maintain a slight tuck in your chin to avoid straining your neck.
- Make sure to distribute the backbend evenly along your spine, avoiding excessive compression in the lower back. Engage your core muscles to support your lower back and protect your spine.
- Continue breathing deeply and steadily as you hold the pose for 15 to 30 seconds, or longer if comfortable.
- To release the pose, exhale and slowly lower your upper body back down to the mat. Rest your forehead on the mat and relax, allowing your body to recover.
Tips:
- Avoid using excessive force to lift yourself up. Focus on engaging the muscles in your back and gradually increasing the lift as your body allows.
- Keep your buttocks relaxed throughout the pose and avoid gripping or tensing your glutes.
- If you experience any discomfort or strain in your lower back, you can modify the pose by lifting your upper body only partway or by placing your hands lower, closer to your ribcage.
- As with any yoga pose, listen to your body and don't push beyond your comfort zone. Modify or skip the pose if you have any specific back or neck injuries or conditions.
It's always beneficial to learn Bhujangasana under the guidance of a qualified yoga instructor, who can provide personalized adjustments and modifications based on your individual needs and abilities.


