- Home›
- Healthy Living›
- 12 Yoga Exercises To Sculpt Your Thighs And Hips
12 Yoga Exercises To Sculpt Your Thighs And Hips
By: Priyanka Maheshwari Sun, 10 Sep 2023 2:13:00
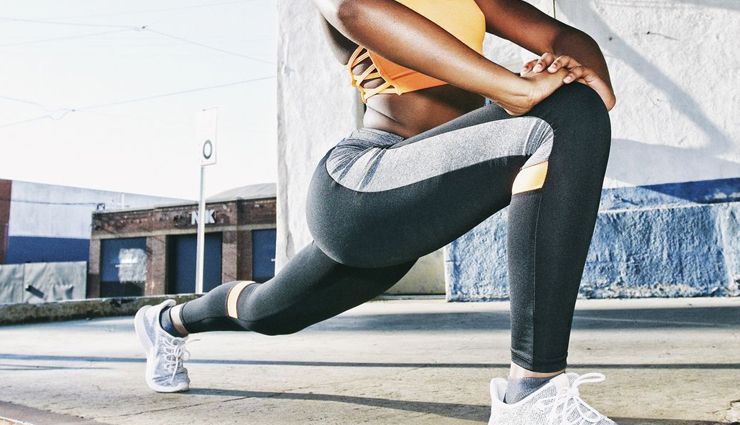
Toning and sculpting the thighs and hips is a fitness goal for many individuals. These areas of the body can often accumulate excess fat and lack the muscle definition that some desire. While there are various exercises and workouts designed to target these specific areas, yoga offers a unique approach that combines physical postures, mindful breathing, and mental focus. In this collection of yoga exercises, we will explore poses and sequences that can help you achieve stronger, more toned thighs and hips.
Yoga, an ancient practice that originated in India, goes beyond physical fitness; it embraces the holistic well-being of the body and mind. Yoga postures, also known as asanas, are designed to improve flexibility, build strength, and enhance balance. When it comes to sculpting the thighs and hips, yoga offers a gentle yet effective way to engage and work these muscle groups while promoting overall health and harmony.
In this series, we will guide you through a selection of yoga exercises that specifically target the thighs and hips. These poses not only help strengthen and tone the muscles in these areas but also provide numerous additional benefits, such as improved posture, increased flexibility, and stress reduction. Whether you're new to yoga or a seasoned practitioner, incorporating these exercises into your routine can contribute to achieving your fitness goals while fostering a sense of well-being and balance in your life. So, let's begin this journey toward sculpted thighs and hips through the practice of yoga.
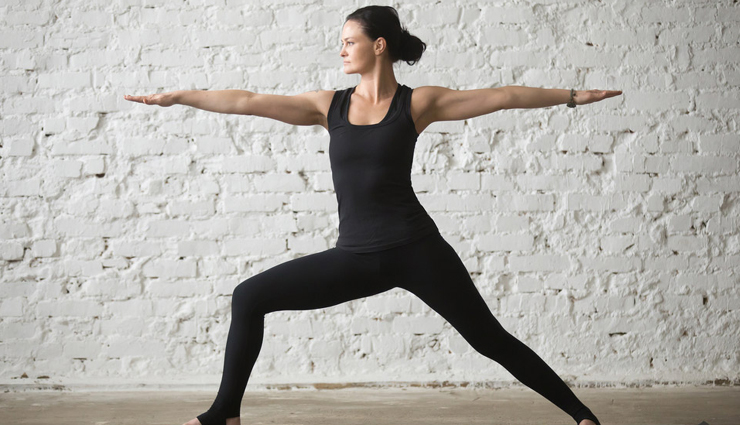
# Warrior II
Also Known As – Virabhadrasana II
Steps to Perform Warrior II:
- Start in Mountain Pose (Tadasana): Begin by standing tall with your feet hip-width apart. Align your heels and keep your arms by your sides, palms facing forward.
- Step Your Feet Apart: Take a wide step back with your right foot, about 3 to 4 feet behind you. Your left foot should remain in its original position.
- Position Your Feet: Turn your right foot outward at a 90-degree angle, so your toes point to the right side of the mat. Your left foot should point forward.
- Align Your Hips: Square your hips to the front of the mat. This means that your left hip rotates slightly outward, and your right hip rotates inward to create a parallel alignment with the front of the mat.
- Extend Your Arms: Extend your arms out to the sides, parallel to the floor, with your palms facing down. Your arms should be in line with your shoulders.
- Bend Your Left Knee: As you inhale, bend your left knee, keeping it directly above your left ankle. Your left thigh should be parallel to the floor, and your shin should be perpendicular to the floor. Ensure that your knee does not go beyond your ankle to protect it from strain.
- Gaze Over Your Left Hand: Turn your head to the left and gaze over your left hand, keeping your neck relaxed. Your gaze should be steady and focused.
- Engage Your Core: Draw your navel gently toward your spine to engage your core muscles. This will help stabilize your posture.
- Maintain Steady Breathing: Take slow, deep breaths while holding the pose. Try to stay in Warrior II for several breaths, gradually working up to longer durations.
- Reverse and Repeat: To come out of the pose, straighten your left knee, turn your feet to face forward, and return to Mountain Pose. You can then repeat the pose on the opposite side by stepping your left foot back and following the same steps.
Benefits of Warrior II
- Strengthened Thighs: Warrior II is excellent for toning and strengthening the muscles of the thighs, particularly the quadriceps.
- Toned Hips: This pose engages the hip muscles, helping to tone and stabilize the hip region.
- Improved Balance: Practicing Warrior II enhances your sense of balance and stability as you hold the pose.
- Enhanced Flexibility: The posture promotes flexibility in the hips and groin area, making it beneficial for individuals with tight hips.
- Better Posture: Warrior II encourages an upright and strong posture, promoting good spinal alignment.
- Increased Lung Capacity: The deep inhalations and exhalations during the pose improve lung capacity and oxygenate the body.
- Enhanced Circulation: The open stance of Warrior II encourages blood flow, which can be beneficial for overall circulation.
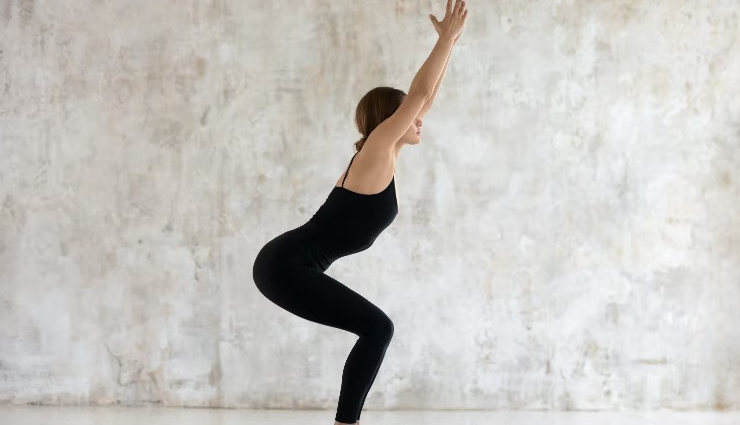
# Chair Pose
Also Known As – Utkatasana
Steps to Perform Chair Pose:
- Start in Mountain Pose (Tadasana): Stand tall with your feet together and arms by your sides, palms facing forward.
- Inhale and Raise Your Arms: As you inhale, raise your arms overhead, keeping them parallel to each other, and bring your palms together.
- Bend Your Knees: Exhale and begin to bend your knees as if you're sitting back into an imaginary chair. Keep your thighs parallel to the ground.
- Engage Your Core: Draw your navel gently toward your spine to engage your core muscles. Ensure that your lower back remains straight.
- Shift Your Weight Back: Shift your weight into your heels while keeping your toes grounded. Imagine pressing your feet into the floor to lift your toes slightly.
- Keep Your Knees Aligned: Ensure that your knees are in line with your ankles and do not go beyond your toes. This will protect your knees from strain.
- Lengthen Your Spine: Lengthen your spine and keep your chest lifted. Gaze forward or slightly upward.
- Hold the Pose: Stay in Chair Pose for 20-30 seconds or longer if comfortable. Focus on your breath and try to sink a little deeper into the pose with each breath.
- Exhale and Release: To release the pose, exhale as you straighten your legs and lower your arms back to your sides, returning to Mountain Pose.
Benefits of Chair Pose:
- Strengthens Leg Muscles: Chair Pose targets the muscles of the thighs, hamstrings, and calves, helping to strengthen and tone these areas.
- Tones the Glutes: This pose engages and tones the gluteal muscles, enhancing the shape of the buttocks.
- Improves Posture: Utkatasana encourages an upright posture, promoting better alignment of the spine and improved body awareness.
- Enhances Balance: Practicing Chair Pose challenges your balance and stability, which can improve coordination over time.
- Builds Core Strength: Engaging the core muscles in this pose helps strengthen the abdominal muscles and improves core stability.
- Stimulates Digestive Organs: The compression of the abdominal area in Chair Pose can aid digestion and help alleviate digestive discomfort.
- Increases Ankle Mobility: This pose promotes flexibility and mobility in the ankle joints.
- Builds Mental Focus: Holding the pose with concentration on your breath and alignment enhances mental focus and mindfulness.
- Energizes the Body: Chair Pose is known to create a feeling of energy and invigoration when practiced.
- Prepares for Sitting Meditation: It is often used as a preparatory pose for seated meditation as it helps settle the mind.
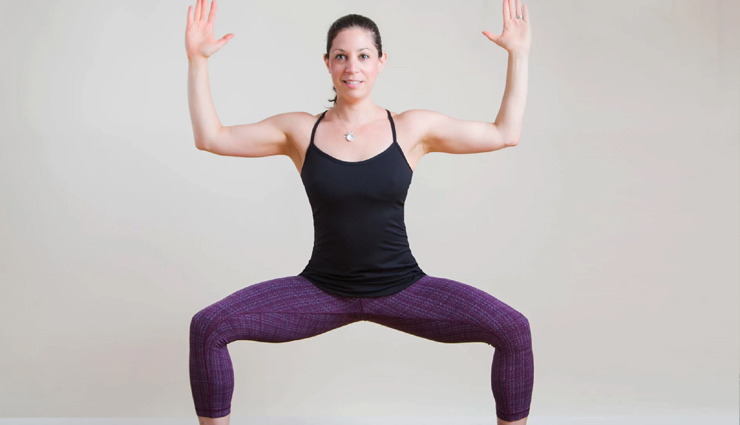
# Goddess Pose
Also Known As – Utkata Konasana
Steps to Perform Goddess Pose:
- Start in Mountain Pose (Tadasana): Stand tall with your feet together, arms by your sides, and palms facing forward.
- Step Your Feet Apart: Take a wide step to the sides, about 3 to 4 feet apart, depending on your comfort and flexibility.
- Turn Your Toes Outward: Rotate both feet outward, so your toes point to the corners of the room. Your heels should be slightly turned in.
- Bend Your Knees: Inhale and bend your knees, lowering your hips toward the ground. Keep your knees aligned with your ankles and pointed in the same direction as your toes.
- Engage Your Core: Activate your core muscles by drawing your navel gently toward your spine.
- Extend Your Arms: Raise your arms out to the sides, parallel to the floor, with your palms facing down. Your arms should be at shoulder height.
- Open Your Chest: Keep your chest lifted and open, with your shoulders relaxed away from your ears.
- Hold the Pose: Stay in Goddess Pose for 20-30 seconds or longer, depending on your strength and comfort level. Focus on your breath and maintaining the posture.
- Straighten Your Legs: To release the pose, straighten your legs, bringing your feet back to hip-width apart, and lower your arms to your sides.
Benefits of Goddess Pose:
- Strengthens the Legs: Goddess Pose engages and strengthens the muscles of the thighs, including the quadriceps and inner thighs.
- Tones the Hips: This pose tones and stabilizes the hip muscles, enhancing hip flexibility and strength.
- Promotes Balance: Practicing Goddess Pose challenges your balance and improves stability as you hold the wide-legged stance.
- Empowers and Energizes: The pose's strong and open stance can evoke feelings of empowerment and confidence.
- Enhances Core Strength: Engaging your core muscles in this pose helps strengthen the abdominal muscles and improves core stability.
- Hip Flexibility: It stretches the groin and hip flexors, promoting flexibility in these areas.
- Supports Mental Focus: Holding the pose with concentration on your breath and alignment enhances mental focus and mindfulness.
- Prepares for Childbirth: Goddess Pose is sometimes recommended during pregnancy to help open the pelvis and strengthen the legs in preparation for childbirth.
- Emotional Release: Some practitioners find that the wide-legged stance and grounding nature of the pose can aid in emotional release and stress relief.
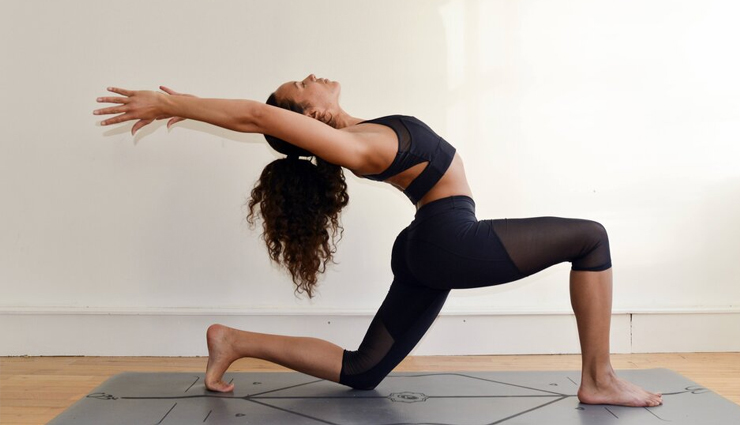
# Crescent Lunge
Also Known As – Anjaneyasana
Steps to Perform Crescent Lunge:
- Start in Mountain Pose (Tadasana): Begin by standing tall with your feet hip-width apart, arms by your sides, and palms facing forward.
- Step One Foot Back: Take a step back with your right foot, extending it behind you. Ground the heel of your right foot into the floor and keep your toes pointing down.
- Bend Your Left Knee: As you inhale, bend your left knee, lowering your hips toward the floor. Ensure that your left knee is directly above your left ankle, forming a 90-degree angle.
- Lift Your Arms: As you continue to inhale, raise your arms overhead, reaching toward the ceiling. Keep your arms parallel and palms facing each other or bring your palms together.
- Engage Your Core: Draw your navel gently toward your spine to engage your core muscles. This will help stabilize your posture.
- Lengthen Your Spine: Lengthen your spine and keep your chest open and lifted. Ensure your shoulders are relaxed away from your ears.
- Gaze Forward: Fix your gaze forward, keeping your neck in a neutral position.
- Hold the Pose: Stay in Crescent Lunge for 20-30 seconds or longer, focusing on your breath and maintaining the posture.
- Exhale and Release: To release the pose, exhale as you lower your arms and step your right foot forward to return to Mountain Pose.
Benefits of Crescent Lunge:
- Strengthens the Legs: Crescent Lunge works to strengthen the muscles of the thighs, including the quadriceps, while also toning the calf muscles.
- Hip Flexor Stretch: It stretches the hip flexors of the back leg, promoting flexibility in this area.
- Balances the Core: Engaging the core muscles in this pose helps improve core strength and stability.
- Improves Balance: Crescent Lunge challenges your balance and coordination, enhancing your overall sense of balance.
- Enhances Ankle Flexibility: This pose encourages flexibility in the ankle joints.
- Expands the Chest: The open-chested position of Crescent Lunge promotes better lung capacity and chest expansion.
- Improves Posture: Practicing this pose encourages an upright and strong posture, promoting good spinal alignment.
- Mind-Body Connection: Focusing on your breath and alignment fosters a deeper connection between your mind and body.
- Stress Reduction: Like many yoga poses, Crescent Lunge can help reduce stress and anxiety when practiced mindfully.
- Prepares for Deeper Backbends: It is often used as a preparatory pose for deeper backbends in yoga practice.
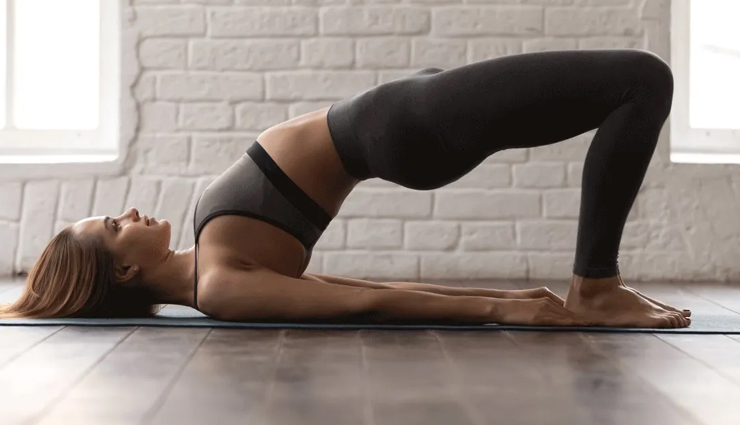
# Bridge Pose
Also Known As – Setu Bandhasana
Steps to Perform Bridge Pose:
- Begin in Supine Position: Lie on your back with your knees bent and feet flat on the floor, hip-width apart. Your arms should be by your sides, palms facing down.
- Position Your Feet: Ensure that your feet are close enough to your buttocks that you can touch your heels with your fingertips when your arms are extended.
- Inhale and Lift Your Hips: As you inhale, press your feet firmly into the floor and lift your hips off the ground. Engage your glutes and core muscles to help lift your pelvis. Your thighs should be roughly parallel to the floor.
- Interlace Your Fingers: Slide your arms beneath your body and interlace your fingers, pressing your palms together. You can also keep your arms by your sides, palms facing down, if interlacing your fingers is uncomfortable.
- Roll Your Shoulders Under: Roll your shoulders under your body to open up your chest and create a slight lift in the upper back. Keep your chin tucked slightly to maintain a neutral neck position.
- Hold the Pose: Stay in Bridge Pose for 20-30 seconds or longer, focusing on your breath and maintaining the posture.
- Exhale and Release: To release the pose, unclasp your hands if they are interlaced, and slowly lower your hips back to the floor, one vertebra at a time.
Benefits of Bridge Pose:
- Strengthens the Back: Bridge Pose strengthens the muscles of the back, including the lower back, upper back, and glutes.
- Tones the Legs: This pose engages and tones the muscles of the thighs and hamstrings.
- Hip Flexor Stretch: It stretches the hip flexors, which can become tight from prolonged sitting.
- Improves Spine Flexibility: Bridge Pose helps improve spinal flexibility and mobility, particularly in the lumbar region.
- Relieves Back Pain: Regular practice can alleviate mild to moderate back pain and discomfort.
- Opens the Chest: The pose opens up the chest, promoting better lung capacity and improving posture.
- Strengthens the Core: Engaging the core muscles in this pose helps strengthen the abdominal muscles and improves core stability.
- Stress Reduction: Like many yoga poses, Bridge Pose can help reduce stress and anxiety when practiced mindfully.
- Balances the Nervous System: The pose can have a calming effect on the nervous system, making it useful for relaxation.
- Prepares for Deeper Backbends: It is often used as a preparatory pose for more advanced backbends in yoga practice.
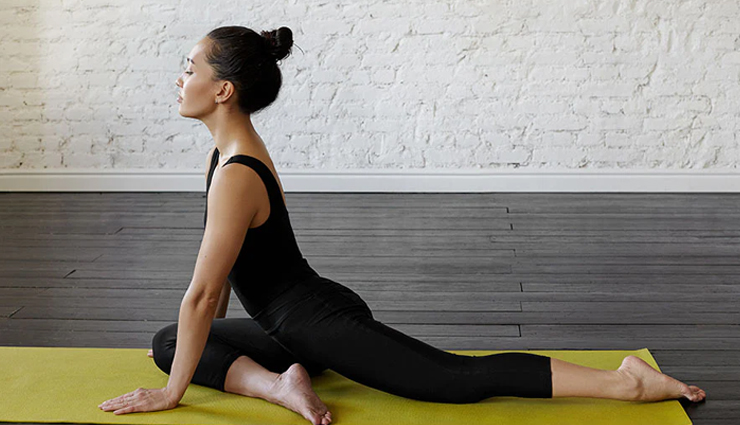
# Pigeon Pose
Also Known As – Eka Pada Rajakapotasana
Steps to Perform Pigeon Pose:
- Starting Position: Begin in a tabletop position (hands and knees) on your yoga mat.
- Prepare for Pigeon: Bring your right knee forward toward your right wrist. Angle your right knee slightly outward so that your right foot is closer to your left hip. Your shin will be almost parallel to the front edge of your mat.
- Extend Your Left Leg: Stretch your left leg straight out behind you. Your left toes should be pointed and the top of your left foot should rest on the floor.
- Square Your Hips: Make sure your hips are square to the front of your mat. You can adjust your right foot's position as needed to achieve this alignment.
- Inhale and Lengthen Your Spine: Inhale and lengthen your spine by lifting your chest and keeping your shoulders relaxed away from your ears.
- Exhale and Fold Forward: As you exhale, begin to walk your hands forward, lowering your upper body toward the floor. You can rest your forearms on the mat or extend your arms fully, placing your forehead on the mat.
- Hold the Pose: Stay in Pigeon Pose for 20-30 seconds or longer, focusing on your breath and allowing your body to relax into the stretch.
- Switch Sides: To release the pose, press your hands into the mat and walk them back toward your body. Lift your hips, slide your right knee back, and return to the tabletop position. You can then switch to the left side and repeat the steps.
Benefits of Pigeon Pose:
- Hip Flexibility: Pigeon Pose is renowned for stretching and opening the hip flexors, hip rotators, and the deep hip muscles.
- Hip Mobility: The pose improves hip mobility and range of motion, making it beneficial for people with tight hips.
- Lower Back Relief: It can alleviate lower back tension and discomfort by addressing issues related to hip tightness.
- Emotional Release: Pigeon Pose is known to be emotionally therapeutic, as some practitioners may release stored emotions and stress while holding the pose.
- Improved Posture: Regular practice of this pose can promote better posture by releasing tension in the hips and lower back.
- Balances the Nervous System: Pigeon Pose can have a calming effect on the nervous system, making it useful for relaxation and stress reduction.
- Strengthens and Tones: It strengthens the muscles around the pelvis and engages the core muscles.
- Sciatica Relief: The pose can provide relief from sciatic pain by stretching the sciatic nerve and reducing compression.
- Preparation for Deeper Backbends: Pigeon Pose is often used as a preparatory pose for more advanced backbends in yoga practice.

# Garland Pose
Also Known As – Malasana
Steps to Perform Garland Pose:
- Starting Position: Begin by standing tall at the top of your yoga mat with your feet hip-width apart and arms by your sides.
- Step Your Feet Wider: Take a wide step to the sides, about shoulder-width apart, or wider if needed for comfort.
- Turn Your Toes Outward: Rotate both feet outward so that your toes point to the corners of the room. Your heels should be slightly turned in.
- Bend Your Knees: As you exhale, bend your knees and lower your hips toward the ground. Keep your knees pointing in the same direction as your toes.
- Bring Your Hands to Your Heart: With your knees bent, bring your hands together at your heart in a prayer position (Namaste). Use your elbows to gently press your knees apart, creating space.
- Lengthen Your Spine: Lengthen your spine as you maintain a straight back. Engage your core muscles to support your posture.
- Sink into the Pose: Lower your hips as close to the ground as comfortably possible. Ideally, your hips should be at or below knee level.
- Gaze Forward: Fix your gaze forward or slightly upward, keeping your neck in a neutral position.
- Hold the Pose: Stay in Garland Pose for 20-30 seconds or longer, focusing on your breath and maintaining the posture.
- Release the Pose: To release, place your hands on the floor in front of you and slowly straighten your legs to return to a standing position. You can also use your hands to support yourself as you lower onto your buttocks and then extend your legs.
Modifications and Variations:
- If you have difficulty balancing in the full pose, you can place a yoga block or cushion under your heels for support.
- You can also keep your hands on the floor in front of you if bringing them to your heart is challenging.
Benefits of Garland Pose:
- Hip Flexibility: Malasana stretches and opens the hip flexors, groin, and inner thigh muscles, promoting hip flexibility.
- Strengthening: The pose strengthens the muscles of the thighs, calves, and ankles.
- Improves Digestion: Practicing Garland Pose can aid digestion and alleviate digestive discomfort.
- Enhances Balance: Balancing in this pose challenges your stability and balance, improving coordination.
- Strengthens the Core: Engaging your core muscles helps strengthen the abdominal muscles and improves core stability.
- Opens the Chest: The chest is expanded, allowing for better lung capacity and posture improvement.
- Pelvic Floor Engagement: Malasana engages the pelvic floor muscles, which can be beneficial for pelvic health.
- Calms the Mind: The grounded nature of this pose can have a calming effect on the mind, reducing stress and anxiety.
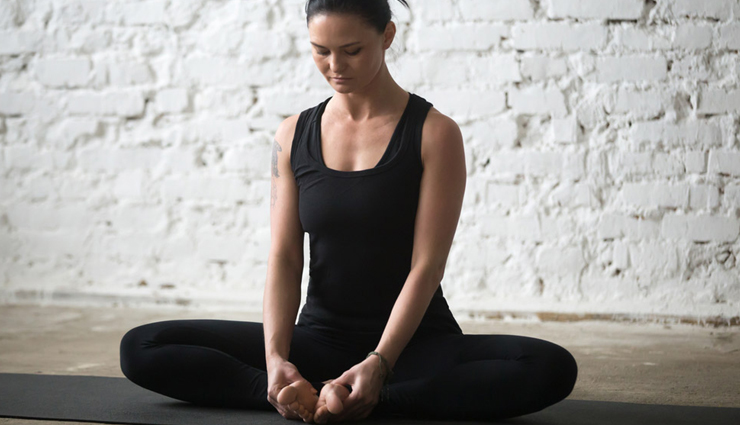
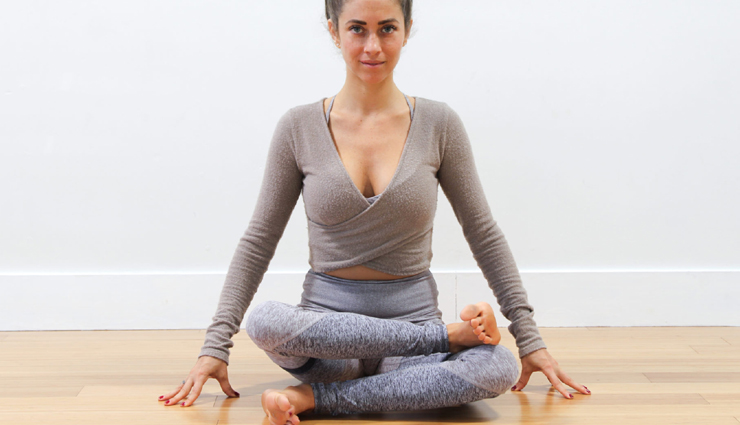
# Bound Angle Pose
Also Known As – Baddha Konasana
Steps to Perform Bound Angle Pose:
- Starting Position: Begin by sitting on your yoga mat with your legs extended straight in front of you.
- Bend Your Knees: Bend your knees and draw your heels toward your pelvis.
- Join Your Feet: Bring the soles of your feet together, allowing your knees to fall outward. Your feet should be close to your pelvis, and your heels should touch each other.
- Hold Your Feet: Hold your feet with your hands. You can grasp your big toes with your index and middle fingers, or hold your ankles if that's more comfortable.
- Lengthen Your Spine: Sit up tall and lengthen your spine. Imagine your head reaching toward the ceiling.
- Flap Your Knees: To deepen the stretch, gently flap your knees up and down like the wings of a butterfly. Keep your breath steady as you do this.
- Hold the Pose: You can hold Bound Angle Pose for 20-30 seconds or longer, focusing on your breath and allowing your knees to lower toward the floor over time.
- Release the Pose: To release, gently release your feet, extend your legs forward, and shake them out to release any tension.
Benefits of Bound Angle Pose:
- Hip Flexibility: Baddha Konasana is known for stretching and opening the hip flexors, groin, and inner thigh muscles, promoting hip flexibility.
- Inner Thigh Stretch: It provides a deep stretch to the inner thighs, which can help alleviate tension in this area.
- Pelvic Floor Engagement: This pose engages the pelvic floor muscles, which can be beneficial for pelvic health.
- Lower Back Relief: Bound Angle Pose can alleviate lower back tension and discomfort by addressing issues related to hip tightness.
- Digestive Aid: Practicing this pose can aid digestion and alleviate digestive discomfort.
- Stress Reduction: The grounded and calming nature of this pose can help reduce stress and anxiety when practiced mindfully.
- Prepares for Childbirth: It is sometimes recommended during pregnancy to help open the pelvis and strengthen the legs in preparation for childbirth.
- Balances Energy Flow: Baddha Konasana is believed to balance the flow of energy in the body, particularly in the pelvic area.
- Improves Posture: Regular practice of this pose encourages an upright and strong posture.
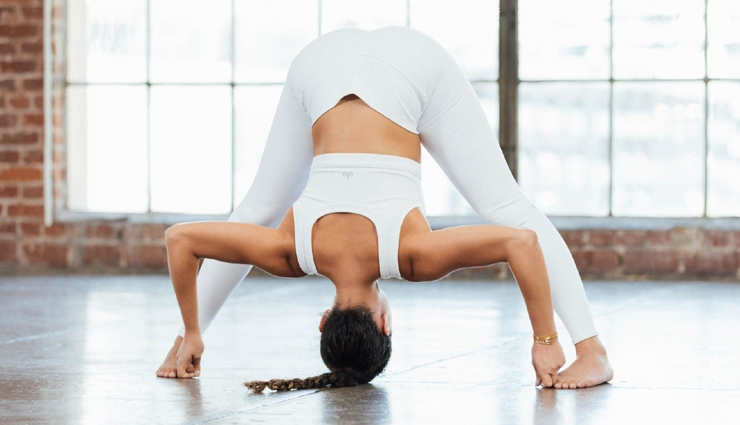
# Wide-Legged Forward Fold
Also Known As – Prasarita Padottanasana
Steps to Perform Wide-Legged Forward Fold:
- Starting Position: Begin by standing tall at the top of your yoga mat with your feet hip-width apart, arms by your sides, and palms facing forward.
- Step Your Feet Apart: Take a wide step to the sides, about 3 to 4 feet apart, depending on your comfort and flexibility.
- Turn Your Toes Inward Slightly: Slightly rotate your toes inward so that they are pointing forward or very slightly turned inward.
- Inhale and Lengthen Your Spine: Inhale and lengthen your spine by lifting your chest and keeping your shoulders relaxed away from your ears.
- Exhale and Fold Forward: As you exhale, hinge at your hips and begin to fold forward from your waist. Keep your spine long and extend your torso forward as you lower it toward the floor.
- Place Your Hands on the Floor: Depending on your flexibility, place your hands on the floor directly beneath your shoulders. If you can't reach the floor comfortably, you can use yoga blocks or place your hands on your shins.
- Engage Your Core: Draw your navel gently toward your spine to engage your core muscles.
- Hold the Pose: Stay in Wide-Legged Forward Fold for 20-30 seconds or longer, focusing on your breath and allowing your body to relax into the stretch.
- Exhale and Release: To release the pose, press your hands into the mat, engage your core, and slowly lift your torso back up to a standing position. You can walk your feet back together to return to the starting position.
Benefits of Wide-Legged Forward Fold:
- Deep Leg Stretch: Prasarita Padottanasana provides a deep stretch to the hamstrings, calves, and inner thighs.
- Hip Flexibility: The wide-legged stance encourages hip flexibility and opens up the hip joints.
- Strengthens the Spine: It strengthens the muscles of the lower back and helps improve spinal flexibility.
- Stress Reduction: Like many yoga poses, Wide-Legged Forward Fold can help reduce stress and anxiety when practiced mindfully.
- Head to Toe Stretch: The pose provides a full-body stretch from the head to the toes, promoting overall body flexibility.
- Pelvic Health: It can engage the pelvic floor muscles and promote pelvic health.
- Improves Posture: Regular practice encourages an upright and strong posture.
- Balance and Focus: Balancing in this pose challenges your stability and concentration, enhancing your overall sense of balance and focus.
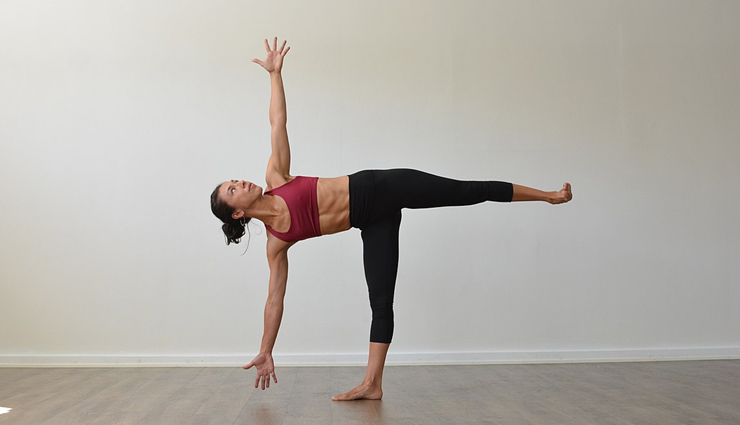
# Half Moon Pose
Also Known As – Ardha Chandrasana
Steps to Perform Half Moon Pose:
- Starting Position: Begin by standing at the top of your yoga mat in Mountain Pose (Tadasana). Ensure your feet are together, arms by your sides, and palms facing forward.
- Step Your Feet Apart: Take a step to the right with your right foot, about 3 to 4 feet apart. Your feet should be parallel to each other.
- Rotate Your Right Foot: Rotate your right foot 90 degrees to the right so that your toes point toward the short edge of your mat.
- Align Your Heels: Ensure that your left heel is aligned with the arch of your right foot.
- Extend Your Arms: As you inhale, extend your arms out to the sides at shoulder height, parallel to the floor. Your palms should be facing down.
- Shift Your Hips: Shift your hips slightly to the left as you prepare to lean over your right leg.
- Exhale and Lean: As you exhale, lean your upper body to the right and place your right hand on the floor or a yoga block on the outside of your right foot. Your right hand should be positioned under your right shoulder.
- Lift Your Left Leg: As you continue to exhale, lift your left leg parallel to the floor. Keep your left hip stacked over your right hip.
- Open Your Chest: Extend your left arm toward the ceiling, stacking your left shoulder over your right shoulder. Your chest should be open, and your gaze can be directed upward or toward the side.
- Hold the Pose: Stay in Half Moon Pose for 20-30 seconds or longer, focusing on your breath and maintaining the posture.
- Exhale and Release: To release the pose, slowly lower your left leg to the floor and return to a standing position. You can then repeat the pose on the opposite side.
Benefits of Half Moon Pose:
- Strengthens the Lower Body: Ardha Chandrasana strengthens the muscles of the legs, particularly the quadriceps, hamstrings, and calves.
- Improves Balance: Balancing in this pose challenges your stability and coordination, enhancing your overall sense of balance.
- Hip Flexor Stretch: It stretches the hip flexors of the raised leg, promoting flexibility in this area.
- Strengthens the Core: Engaging the core muscles in this pose helps improve core strength and stability.
- Improves Concentration: Focusing on balance and alignment can improve concentration and mental focus.
- Opens the Chest and Shoulders: The pose opens up the chest and shoulders, promoting better lung capacity and improving posture.
- Enhances Confidence: Mastering challenging balance poses like Ardha Chandrasana can boost confidence and self-esteem.
- Stress Reduction: Like many yoga poses, Half Moon Pose can help reduce stress and anxiety when practiced mindfully.
- Digestive Aid: The pose can aid digestion and alleviate digestive discomfort.
# Fire Log Pose
Also Known As – Agnistambhasana
Steps to Perform Fire Log Pose:
- Starting Position: Begin by sitting on your yoga mat with your legs extended straight in front of you.
- Bend Your Right Knee: Bend your right knee and bring your right ankle to rest on top of your left thigh, just above the left knee.
- Flex Your Feet: Flex both feet to protect your ankle joints. This means pulling your toes back toward your shins.
- Align Your Shins: Try to align your right shin parallel to the front edge of your mat.
- Bend Your Left Knee: Bend your left knee and bring your left ankle to rest on top of your right thigh, just above the right knee. Your left shin should also be parallel to the front edge of your mat.
- Create a Stacked Position: Aim to create a stacked position with your right ankle over your left knee and your left ankle over your right knee. Your legs should resemble a stack of logs, which is why this pose is called Fire Log Pose.
- Flexibility Check: If your knees are higher than your ankles or you feel any discomfort, you can use yoga props like blocks or cushions to support your knees and sit more comfortably.
- Lengthen Your Spine: Lengthen your spine by sitting up tall, and engage your core muscles for stability.
- Hold the Pose: Stay in Fire Log Pose for 20-30 seconds or longer, focusing on your breath and allowing your hips to gently open over time.
- Switch Sides: To release the pose, gently uncross your legs and extend them forward. Shake out your legs to release any tension. You can then switch to the opposite side, placing your left ankle on top of your right thigh and your right ankle on top of your left thigh.
Benefits of Fire Log Pose:
- Hip Flexibility: Agnistambhasana is known for stretching and opening the hip flexors, groin, and inner thigh muscles, promoting hip flexibility.
- Hip Mobility: The pose improves hip mobility and range of motion, making it beneficial for people with tight hips.
- Relief for Lower Back Tension: Fire Log Pose can alleviate lower back tension and discomfort by addressing issues related to hip tightness.
- Balance and Focus: Balancing in this pose challenges your stability and concentration, enhancing your overall sense of balance and focus.
- Stress Reduction: Like many yoga poses, Fire Log Pose can help reduce stress and anxiety when practiced mindfully.
- Strengthens the Core: Engaging your core muscles in this pose helps improve core strength and stability.
- Prepares for Deeper Hip Openers: It is often used as a preparatory pose for more advanced hip-opening poses in yoga practice.
# Lizard Pose
Also Known As – Utthan Pristhasana
Steps to Perform Lizard Pose:
- Starting Position: Begin in a tabletop position (hands and knees) on your yoga mat.
- Step Your Right Foot Forward: Bring your right foot forward to the outside of your right hand. Your right knee should be aligned with your right ankle.
- Slide Your Left Leg Back: Slide your left leg back as far as is comfortable, keeping your toes tucked under.
- Lower Your Hips: Begin to lower your hips toward the ground. Your upper body should be supported by your hands, and your chest should be open.
- Variation 1 - Hands on Blocks: For a modified version, you can place yoga blocks or cushions under your hands to bring the floor closer to you. This can be especially helpful if you have limited flexibility.
- Variation 2 - Forearms Down: For a deeper stretch, you can lower down onto your forearms, placing your forearms on the ground. This variation is often called "Lizard Pose with Forearms Down."
- Variation 3 - Back Knee Down: If you want to deepen the stretch further, you can lower your back knee to the ground, creating a deeper hip stretch. This variation is sometimes called "Lizard Pose with Back Knee Down."
- Hold the Pose: Stay in Lizard Pose for 20-30 seconds or longer, focusing on your breath and allowing your body to relax into the stretch.
- Switch Sides: To release the pose, press your hands into the mat and carefully slide your right foot back to meet your left knee. You can then switch to the left side and repeat the steps.
Benefits of Lizard Pose:
- Deep Hip Stretch: Lizard Pose is renowned for stretching and opening the hip flexors, groin, and inner thigh muscles, promoting hip flexibility.
- Hip Flexor Release: It helps release tension in the hip flexor muscles, which can become tight due to prolonged sitting.
- Strengthens Core and Legs: Engaging the core muscles and legs in this pose helps strengthen these areas.
- Balance and Focus: Balancing in Lizard Pose challenges your stability and concentration, enhancing your overall sense of balance and focus.
- Stress Reduction: Like many yoga poses, Lizard Pose can help reduce stress and anxiety when practiced mindfully.
- Digestive Aid: The pose can aid digestion and alleviate digestive discomfort.
- Prepares for Deeper Hip Openers: Lizard Pose is often used as a preparatory pose for more advanced hip-opening poses in yoga practice.