- Home›
- Healthy Living›
- 5 Yoga Asanas That Are Effective In Treating Epilepsy
5 Yoga Asanas That Are Effective In Treating Epilepsy
By: Priyanka Maheshwari Fri, 23 Feb 2024 11:08:23
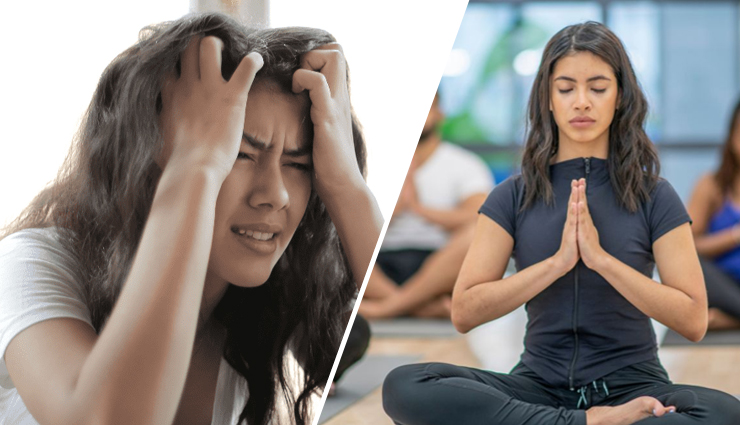
Epileptic seizures present a daunting challenge, with their unpredictable occurrence, leaving one in a state of uncertainty. Seeking a remedy for this condition is imperative, and yoga emerges as a highly effective avenue for managing epilepsy.
How does yoga achieve this? By fostering harmony between body and mind, yoga aids in better management and reduction of epileptic episodes. This holistic approach is truly remarkable.
Indeed, yoga stands as the optimal choice for addressing epilepsy, offering a repertoire of seven beneficial poses tailored for this purpose. Explore these poses below.
Before delving into the specifics, let's delve into the essence of epilepsy.
What Exactly Is Epilepsy?
Epilepsy manifests as a condition characterized by recurring and unprovoked seizures, affecting approximately sixty-five million individuals worldwide.
These seizures can vary in duration and intensity, ranging from momentary lapses in consciousness to convulsive episodes that may result in physical harm. Often, seizures cause individuals to lose awareness of their surroundings and may lead to falls.
The root cause of these seizures lies in abnormal neuronal activity within the brain, where heightened cellular hyperactivity triggers their onset.
Now, let's delve into how yoga serves as a remedy for epilepsy.
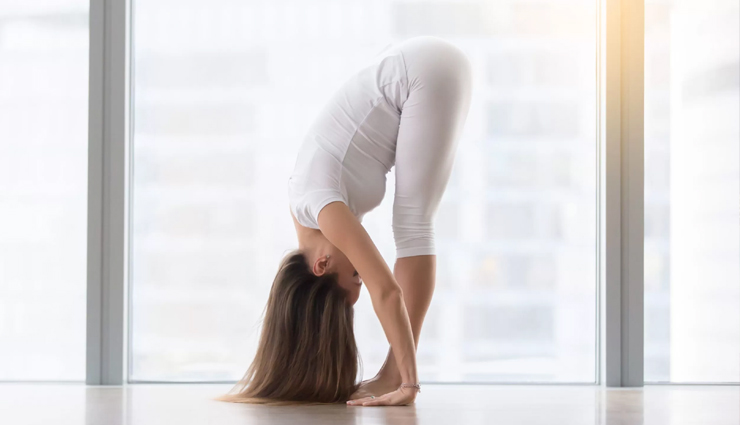
# Uttanasana
Sure, here are the step-by-step instructions to perform Uttanasana (Standing Forward Bend):
- Starting Position: Begin by standing tall in Tadasana (Mountain Pose) with your feet hip-width apart or together, depending on your comfort level. Distribute your weight evenly across both feet.
- Inhale: Take a deep breath in as you lengthen your spine, lifting your chest slightly and engaging your abdominal muscles to support your lower back.
- Exhale: On the exhale, soften your knees slightly and begin to hinge forward at your hips. Keep your spine long as you fold forward, leading with your chest.
- Forward Fold: Continue to fold forward until your torso is parallel to the floor or until you feel a comfortable stretch in the backs of your legs. Allow your head and neck to relax, releasing any tension.
- Hand Placement: Depending on your flexibility, you can place your hands on the floor beside your feet, on your shins, or grasp opposite elbows. If reaching the floor is challenging, you can use yoga blocks to support your hands.
- Relaxation: Once you're in the full forward fold, focus on relaxing your neck, shoulders, and facial muscles. Allow the weight of your upper body to gently stretch your hamstrings and calves.
- Breathing: Take slow, deep breaths in this pose, allowing your breath to deepen the stretch with each exhale. Hold the pose for 30 seconds to one minute, or longer if comfortable.
- Release: To exit the pose, gently bend your knees and place your hands on your hips for support. Inhale as you slowly rise back up to standing, keeping your spine long.
- Return to Tadasana: Once upright, take a moment to notice the effects of the pose on your body and breath. Stand tall in Tadasana, maintaining a sense of grounding through your feet.
Remember to listen to your body and modify the pose as needed to ensure comfort and safety. If you have any specific medical concerns or conditions like epilepsy, consult with a qualified yoga instructor or healthcare professional before practicing Uttanasana or any other yoga pose.
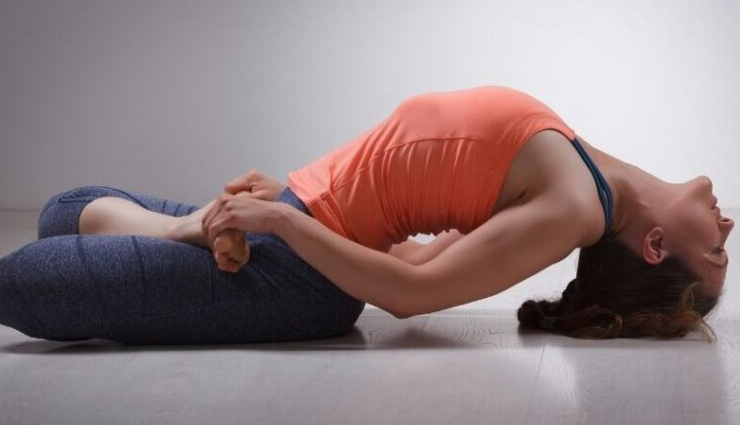
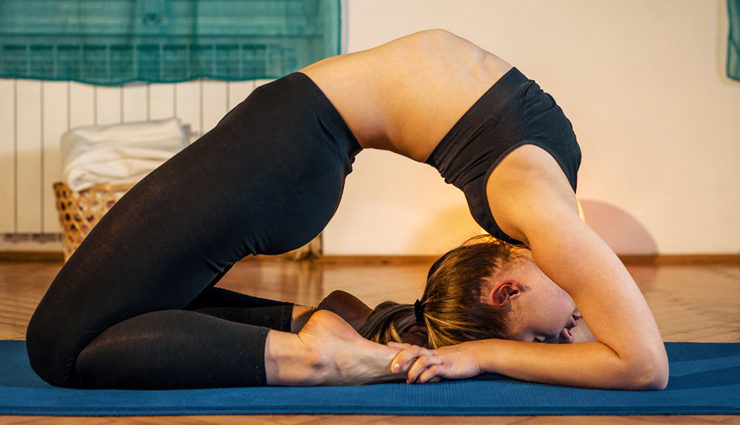
# Matsyasana
Here are the steps to perform Matsyasana (Fish Pose):
- Starting Position: Begin by lying flat on your back on a yoga mat, legs extended, and arms resting by your sides.
- Place Your Hands Underneath Your Buttocks: Slide your hands, palms facing down, underneath your buttocks. Position your hands under your thighs with your elbows tucked in close to your body.
- Engage Your Legs: Press your thighs and buttocks into the floor to stabilize your lower body.
- Inhale, Lift Your Chest: As you inhale, press down through your forearms and elbows, lifting your chest and upper body off the mat. Keep your neck and head relaxed, allowing them to gently fall back.
- Arch Your Back: Arch your back and lift your sternum toward the ceiling. Keep your shoulder blades drawing toward each other to open your chest.
- Crown of the Head to the Mat: If comfortable, lower the crown of your head to the mat, creating a gentle backbend in your spine. Avoid putting too much weight on your head; instead, use your arms and back muscles to support the arch.
- Hold the Pose: Hold the pose for 15-30 seconds, breathing deeply and maintaining a steady, relaxed breath.
- Release: To come out of the pose, gently lift your head off the mat, straighten your neck, and lower your upper body back down to the floor.
- Extend Your Legs: Release your hands from underneath your buttocks and extend your legs fully on the mat.
- Rest: Lie flat on your back for a few breaths, allowing your spine to return to its natural alignment.
Matsyasana is a backbend that opens the chest and throat, stimulates the thyroid gland, and stretches the abdomen and neck muscles. It's important to practice this pose mindfully, avoiding any strain or discomfort in the neck or lower back. If you have any neck or back injuries, consult with a qualified yoga instructor or healthcare professional before attempting Matsyasana.
# Kapotasana
Kapotasana, also known as Pigeon Pose, is an intermediate to advanced yoga posture that requires flexibility and strength. Here are the steps to perform Kapotasana:
- Begin in Tabletop Position: Start on your hands and knees, with your wrists aligned under your shoulders and your knees under your hips.
- Slide Your Right Knee Forward: Bring your right knee forward toward your right wrist. Angle your right shin under your torso, positioning it diagonally. Your right foot should be in front of your left hip.
- Extend Your Left Leg Backward: Slide your left leg straight back behind you. Your left thigh should be parallel to the long edge of your mat, with the top of your left foot resting on the mat.
- Alignment Check: Ensure that your hips are level and squared to the front of your mat. Your right knee should be positioned slightly wider than your right hip, and your left hip should be pressing down toward the mat.
- Inhale, Lengthen Your Spine: Take a deep breath in and lengthen your spine, lifting your chest slightly.
- Exhale, Fold Forward: As you exhale, walk your hands forward and lower your torso toward the mat. You can rest your forearms on the mat or extend your arms fully, lowering your chest toward the ground.
- Relax Your Upper Body: Allow your forehead to rest on the mat, a block, or your fists. Release any tension in your neck and shoulders.
- Hold the Pose: Hold Kapotasana for 5-10 breaths, breathing deeply and allowing your body to relax into the stretch.
- Switch Sides: To release the pose, press into your hands and lift your chest. Slide your right leg back and return to Tabletop Position. Repeat the pose on the opposite side, bringing your left knee forward.
- Rest in Child's Pose: After practicing Kapotasana on both sides, rest in Balasana (Child's Pose) to release any tension in your hips and lower back.
Kapotasana stretches the thighs, groins, and psoas muscles while also opening the chest and shoulders. It's essential to practice Kapotasana mindfully, listening to your body and avoiding any pain or discomfort. If you're new to this pose or have any hip or knee injuries, you can use props like yoga blocks or blankets for support. Additionally, consider practicing under the guidance of a qualified yoga instructor to ensure proper alignment and technique.
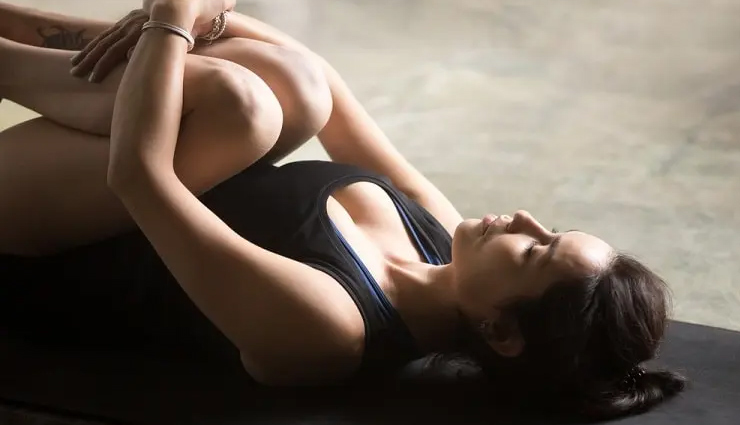
# Pavanamuktasana
Pavanamuktasana, also known as Wind-Relieving Pose, is a yoga posture that helps in relieving gas and bloating while also stretching and strengthening the abdominal muscles. Here are the steps to perform Pavanamuktasana:
- Starting Position: Begin by lying flat on your back (supine position) on a yoga mat, with your legs extended and arms resting alongside your body, palms facing down.
- Inhale, Bend Your Knees: As you inhale, bend your knees and bring them toward your chest.
- Interlace Your Fingers: Reach your arms around your legs and interlace your fingers just below your knees.
- Exhale, Lift Your Head: On the exhale, lift your head and bring your forehead toward your knees. Your chin can be slightly tucked toward your chest.
- Hug Your Knees: Hug your knees in toward your chest, using your arms to gently pull them closer. Keep your shoulders relaxed and pressed into the mat.
- Hold the Pose: Hold Pavanamuktasana for 20-30 seconds, breathing deeply and evenly. Focus on relaxing any tension in your abdomen and lower back.
- Release: To release the pose, exhale as you gently lower your head back down to the mat. Release your hands from your knees and extend your legs back out onto the mat.
- Rest: Take a moment to rest in Savasana (Corpse Pose), allowing your body to relax fully and absorb the benefits of the posture.
- Repeat: You can repeat Pavanamuktasana several times, depending on your comfort level and how your body feels.
Pavanamuktasana helps in improving digestion, relieving gas and bloating, and toning the abdominal muscles. It's a gentle pose that can be practiced by individuals of all levels, including beginners. However, if you have any existing medical conditions or injuries, it's advisable to consult with a healthcare professional before practicing this or any other yoga posture.
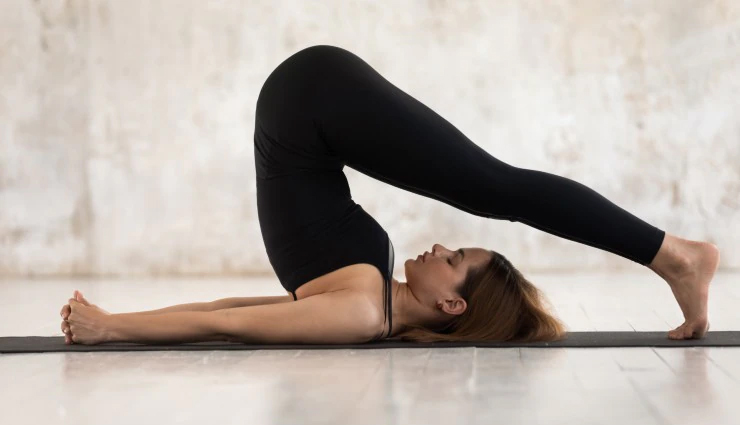
# Halasana (Plow Pose)
Halasana, also known as Plow Pose, is an intermediate to advanced yoga posture that provides a deep stretch to the spine, shoulders, and hamstrings. Here are the steps to perform Halasana:
- Lie on Your Back: Start by lying flat on your back (supine position) on a yoga mat, with your arms resting alongside your body, palms facing down.
- Inhale, Lift Your Legs: As you inhale, engage your core muscles and lift your legs off the floor, bringing them toward the ceiling.
- Support Your Lower Back: Place your hands on your lower back for support. Keep your elbows close to your body and your palms pressing into your lower back.
- Exhale, Lower Your Legs: On the exhale, slowly lower your legs behind your head, aiming to bring your toes to the floor above your head. Keep your legs straight and your toes pointed.
- Lengthen Your Spine: Once your legs are extended overhead, focus on lengthening your spine by reaching your toes toward the floor and lifting your hips away from your shoulders.
- Support Your Back: If your toes do not reach the floor, continue to support your lower back with your hands. Avoid putting too much pressure on your neck or head.
- Hold the Pose: Hold Halasana for 5-10 breaths, breathing deeply and evenly. Keep your neck relaxed and avoid turning your head from side to side.
- Release: To release the pose, slowly bring your legs back overhead, supporting your lower back with your hands. Then, gently lower your legs back down to the floor.
- Rest: After releasing the pose, take a moment to rest in Savasana (Corpse Pose), allowing your body to relax fully and integrate the benefits of the posture.
Halasana provides a deep stretch to the spine, shoulders, and hamstrings, while also stimulating the thyroid gland and calming the nervous system. It's essential to practice this pose mindfully and avoid any strain or discomfort in the neck or spine. If you have any neck injuries or medical conditions, consult with a qualified yoga instructor or healthcare professional before attempting Halasana.