- Home›
- Hunger Struck›
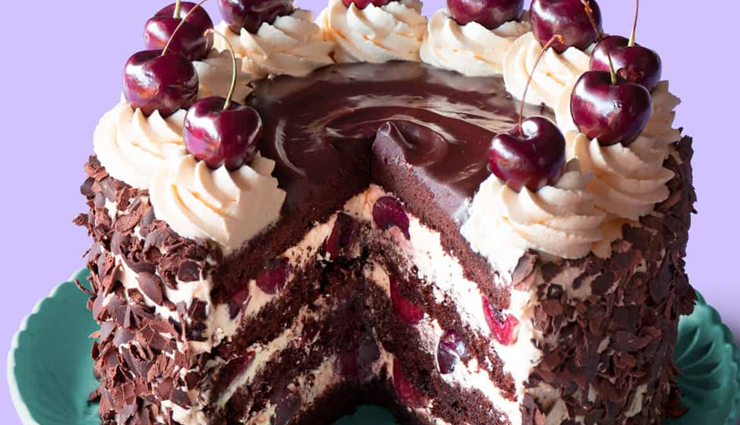
- Recipe- Bakery Style Egg Less Black Forest Cake
Recipe- Bakery Style Egg Less Black Forest Cake
By: Kratika Maheshwari Wed, 09 Nov 2022 4:29:16
Of course there are various steps included between these main steps. We have explained whole process in detail in our recipe below.
Ingredients
For the Chocolate Sponge
Dry Ingredients
¾ cup whole wheat flour
¾ cup maida/all purpose flour
⅓ cup unsweetened cocoa powder
1 teaspoon baking powder
½ teaspoon baking soda
pinch of salt
Wet Ingredients
¾ cup powdered sugar
½ cup thick fresh yogurt/curd/dahi
½ cup oil
1 teaspoon vanilla essence
¾ cup water
For the frosting
400 ml heavy whipping cream (can use more if you like more cream)
2 tablespoon icing sugar (adjust to taste)
Other Ingredients
100 grams tinned cherries, chopped
8-10 tinned cherries for decoration
1-2 tablespoon syrup from tinned cherries
100 grams semi-sweet chocolate bar, grated
cocoa powder, for dusting
Method
For the Chocolate Sponge
- Preheat the oven to 180 degrees Celsius for 10 minutes.
- Sift maida, wheat flour, baking powder, baking soda, cocoa powder and salt together in a bowl. Keep it aside.
- In a wide bowl, take powdered sugar, oil and curd. Whisk well with a beater until light and fluffy.
- Now add vanilla essence and whisk well. Add ½ cup water and mix.
- Add all the dry ingredients in 2-3 batches and gently stir until everything gets mixed well.
- Now gradually add remaining ¼ cup water and mix well to get a lump-free batter.
- Consistency of the batter should be such that it should easily drop from spatula. You can adjust the quantity of water.
- Grease the cake tin with butter and line it with a parchment paper. You can even grease the cake tin with butter/oil and dust with flour. Pour the batter into the tin. Tap 8-10 times just to level the mixture.
- Bake at 180 degrees Celsius for about 30-35 minutes. Baking time will vary for every convection. Be alert and check after 35 minutes.
- Remove from the oven insert a toothpick into the middle of the cake. If it comes out clean, cake is ready. If it doesn’t come out clean, bake for a few more minutes.
- Let it cool down for atleast 30 mins. Once slightly cooled, invert on a wire rack.
- Cover the cake and allow it to cool completely for 3-4 hours.
- Once it comes to room temperature, cover with cling wrap and refrigerate for at least 5-6 hours.
For the frosting
- Pour the chilled whipping cream in a bowl and add icing sugar to it. Beat on medium speed until it doubles in volume.
- Beat until the cream forms stiff peaks.
- If you wish to use it after some time, then cover with cling wrap and refrigerate.
For the cherries
- Open the tin of cherries and drain the syrup in a bowl. Preserve the syrup since we will use this syrup to soak our sponge.
- If cherries have seeds, remove the seeds and roughly chop the cherries into small pieces.
- You can store the remaining cherries along with the syrup in freezer.
- If you want to use fresh cherries, take about ½ - ¾ cup pitted fresh cherries in a pan alongwith 1-2 tablespoon sugar (adjust to taste) and 1 cup water. Let the syrup come to a boil and then let it simmer for 2-3 minutes.
- Remove the syrup from heat and drain it into a bowl using a strainer. Transfer the cherries to another bowl and set aside. That syrup you can use to soak the sponge.
For the chocolate shavings
- Grate the chocolate using a grater. We have used both large and small holes of the grater to make shavings. You can also use a peeler to make chocolate shavings. Spread them in a plate and keep refrigerated.
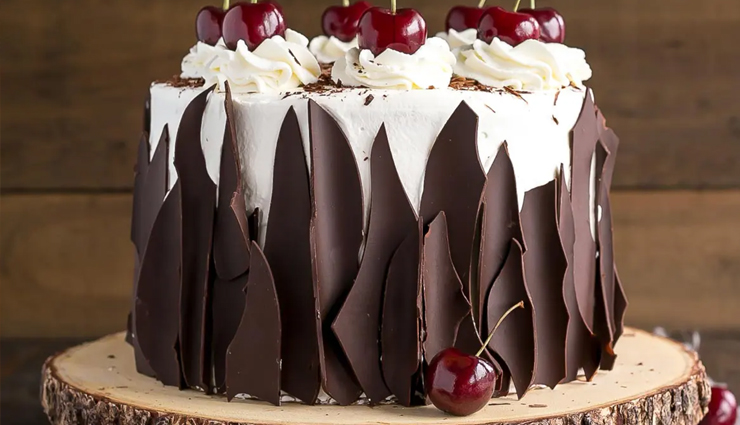
- For the sides, we have used a knife to make chocolate shavings. This is optional, but using different chocolate shavings gives a nice look and texture to the cake.
To assemble the cake
- Once the cake it set, remove the cling wrap, and cut the cake from the middle. We have cut cake in 2 layers, but if you want to can even slice it in 3 to 4 layers.
- Prick the layers with a fork and soak both the layers in cherry syrup. You can use the syrup as per the desired texture of the cake. Do not use too much syrup since this may result in a soggy cake.
- Place 1st half of sponge on a cake board/any flat plate (soaked part facing top) where you want to assemble the cake. You can place this whole arrangement on a turn table.
-Then apply whipped cream and then place some cherries on top.
- Now place the other cake on top (soaked part facing down).
- Apply a thick layer of whipped cream on the top layer and also on the sides of the cake. Use spatula to perfectly finish and level the cream on the cake.
- To level and perfectly finish the frosting, dip the spatula in water, drain excess droplets of water and then just quickly run the spatula over the cake.
- Cover the sides of the cake with chocolate shavings. We have used chocolate shavings which we chopped using a knife.
- Decorate the border using star nozzle and make designs.
- Place the chocolate shavings in the center. We have used grated shavings in the centre. Drop little shavings on the border. Dust top with cocoa powder.
- Place cherries on each cream rose. In the end, drizzle few drops of cherry syrup on the cake just to give a hint of reddish colour. Place in refrigerator for atleast 1 hour before serving.