- Home›
- Healthy Living›
- 7 Amazing Hatha Yoga Asanas
7 Amazing Hatha Yoga Asanas
By: Priyanka Maheshwari Mon, 18 Sep 2023 12:29:03
Hatha Yoga is a traditional and foundational branch of yoga that has deep historical and philosophical roots in ancient India. The term "Hatha" is derived from two Sanskrit words: "Ha," which means sun, and "Tha," which means moon. Together, they represent the balance of opposing forces and energies, symbolizing the union of opposites. Hatha Yoga seeks to harmonize and balance the physical and mental aspects of an individual's being.
One of the distinguishing features of Hatha Yoga is its focus on the physical postures or asanas, along with breath control techniques, known as pranayama. These practices are designed to prepare the body and mind for meditation and spiritual awakening. In essence, Hatha Yoga serves as a stepping stone for higher states of consciousness and self-realization.
Hatha Yoga is often associated with the work of the sage Patanjali and his Yoga Sutras, which outline a comprehensive path to spiritual development. However, it's important to note that Hatha Yoga predates Patanjali's system and has its own set of texts and teachings, including the Hatha Yoga Pradipika and the Gheranda Samhita.
In a Hatha Yoga class or practice session, you can expect to engage in a series of asanas, which range from gentle stretches to more advanced poses. These postures are typically held for varying durations while focusing on proper alignment and breath awareness. The practice of pranayama, or breath control, is also an integral part of Hatha Yoga, as it helps to calm the mind, enhance concentration, and regulate vital life energy (prana).
Hatha Yoga is accessible to people of all ages and fitness levels, making it one of the most popular forms of yoga worldwide. It is not only a physical discipline but also a holistic approach to well-being that encompasses mental and spiritual development. Through consistent practice, individuals can experience improved flexibility, strength, and balance, as well as reduced stress and a greater sense of inner peace.
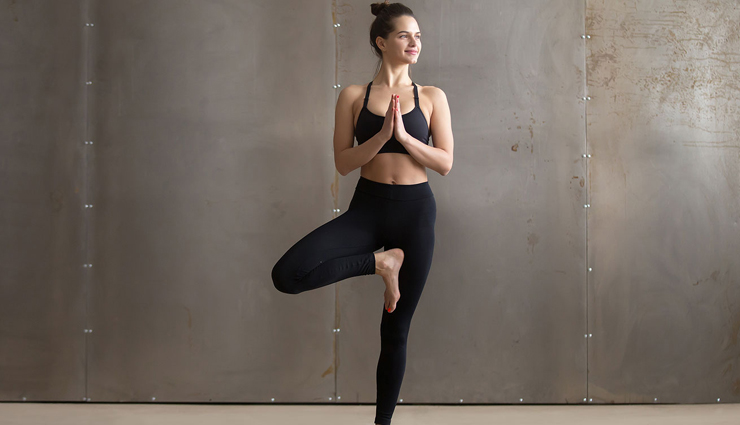
# Vrikshasana (Tree Pose)
- Stand upright with your feet together, arms by your sides, and your gaze straight ahead.
- Shift your weight onto your right foot while keeping the sole of your left foot firmly against your right inner thigh.
- If you can't place your foot on your thigh, you can rest it on your calf or ankle, just avoid placing it directly on the knee joint.
- Engage your core muscles for balance and stability.
- Bring your palms together in a prayer position in front of your chest.
- Find a focal point in front of you to maintain balance. This is your "drishti."
- Inhale deeply and elongate your spine while gently pushing your left foot against your right thigh.
- Lengthen your arms upward while keeping your palms together, reaching toward the ceiling.
- Keep your shoulders relaxed and away from your ears.
- Maintain a steady gaze and continue to breathe deeply.
- Hold the pose for 30 seconds to 1 minute or longer if comfortable.
- To release, gently lower your arms and bring your left foot down to the floor.
- Return to the starting position with your feet together.
- Repeat the pose on the other side by shifting your weight to your left foot and placing your right foot against your left inner thigh.
- Breathe deeply and find your balance again.
- Hold the pose for an equal amount of time as the other side.
- To release, lower your arms and bring your right foot back to the floor.
- Return to the starting position with your feet together.

# Tadasana (Mountain Pose)
- Begin by standing at the front of your yoga mat with your feet together, toes touching, and heels slightly apart.
- Ensure that your weight is evenly distributed across both feet, grounding yourself firmly into the mat.
- Engage your thigh muscles to lift your kneecaps slightly, but keep your legs straight without locking your knees.
- Tuck your tailbone slightly and engage your lower abdominal muscles to support your spine.
- Roll your shoulders back and down, opening your chest, and letting your arms hang naturally by your sides with your palms facing inward.
- Lengthen your neck and align your head so that your ears are directly above your shoulders, and your chin is parallel to the floor.
- Relax your facial muscles and jaw, with your gaze fixed softly ahead at a point on the horizon.
- Breathe deeply and evenly, focusing on your breath as you stand tall in this pose.
- Feel a sense of grounding and stability as you visualize yourself as a mountain, strong and unwavering.
- Hold this pose for 30 seconds to 1 minute, or as long as it's comfortable, continuing to breathe steadily.
- To release, gently lower your arms and step your feet back together if they've moved apart.
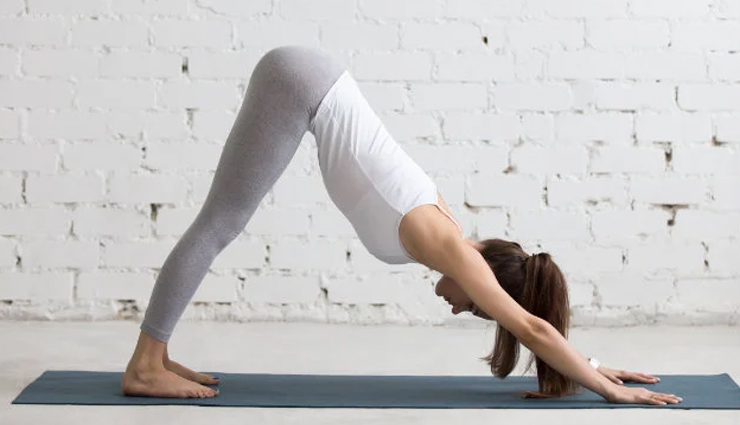
# Adho Mukha Svanasana (Downward-Facing Dog Pose)
- Start in a tabletop position on your yoga mat. Align your wrists directly under your shoulders and your knees under your hips.
- Spread your fingers wide apart, with your middle fingers pointing forward and parallel to each other. Press your palms firmly into the mat.
- Tuck your toes under, and as you exhale, begin to lift your hips toward the ceiling, straightening your arms and legs. Your body should form an inverted V shape.
- Keep your hands shoulder-width apart and your feet hip-width apart. Your toes should point forward or slightly turned inward.
- Press through your palms and actively engage your arms, creating a straight line from your wrists to your tailbone.
- Lengthen your spine, drawing your chest toward your thighs. Keep your neck in line with your spine; your gaze should be directed between your knees or toward your navel.
- Press your heels toward the floor. They may not touch the mat completely, especially if you're a beginner, but work on gradually increasing the stretch in your hamstrings and calves.
- Engage your quadriceps (thigh muscles) to help straighten your legs. If you have tight hamstrings, you can bend your knees slightly.
- Relax your head and neck, letting them hang freely. Your ears should be in line with your upper arms.
- Breathe deeply and evenly, holding the pose for 30 seconds to 1 minute or longer if comfortable.
- To release the pose, bend your knees and lower them to the mat, returning to the tabletop position.

# Baddha Konasana (Cobbler Pose)
- Begin by sitting on your yoga mat with your legs extended straight out in front of you.
- Take a few moments to sit up straight and align your spine. You can place your hands on the floor beside your hips for support.
- Bend your knees and draw your heels toward your pelvis, letting your knees fall out to the sides.
- Press the soles of your feet together, allowing your heels to be as close to your pelvis as is comfortable. Your feet should form a diamond shape with the soles touching.
- Hold your feet with your hands. You can either grasp your big toes with your first and second fingers or hold onto your ankles, depending on your flexibility.
- Sit up tall, lengthening your spine, and engage your core muscles to support your lower back.
- Gently press your knees toward the floor without using excessive force. Avoid pushing your knees down if it causes discomfort; let them naturally open over time with practice.
- Inhale as you lift your chest and open your heart, rolling your shoulders back.
- Keep your feet active by pressing the outer edges of your feet firmly into each other.
- Maintain a relaxed facial expression and focus on your breath. Take slow, deep breaths in and out through your nose.
- Hold this pose for 30 seconds to 1 minute, or as long as it's comfortable, while continuing to breathe deeply.
- To release, gently release the grip on your feet or ankles, and extend your legs straight out in front of you.
# Paschimottanasana (Seated Forward Bend Pose)
- Start by sitting on your yoga mat with your legs extended straight out in front of you. Ensure your spine is straight, and your feet are flexed, with toes pointing upward.
- Sit up tall, engaging your core muscles and lengthening your spine. This will create a strong and stable foundation for the pose.
- Inhale deeply, raising your arms overhead, reaching toward the ceiling.
- Exhale slowly as you hinge at your hips, keeping your back straight, and begin to bend forward from the hips.
- Reach your hands toward your feet. If you can't reach your feet initially, that's okay; aim to hold your ankles, shins, or wherever is comfortable without straining.
- Keep your chin tucked slightly toward your chest, and focus on lengthening your spine rather than rounding your back. This helps protect your lower back.
- Continue to breathe deeply and relax into the stretch, allowing your upper body to gradually fold over your legs.
- If you can comfortably reach your feet, hold onto them with your hands. You can use a yoga strap or towel wrapped around your feet if needed to reach comfortably.
- With each inhale, lengthen your spine and create space. With each exhale, gently deepen the stretch by bringing your chest closer to your thighs.
- Hold this pose for 30 seconds to 1 minute, or as long as it's comfortable, while maintaining deep and even breaths.
- To release, inhale and slowly rise back to an upright seated position, keeping your back straight throughout the movement.
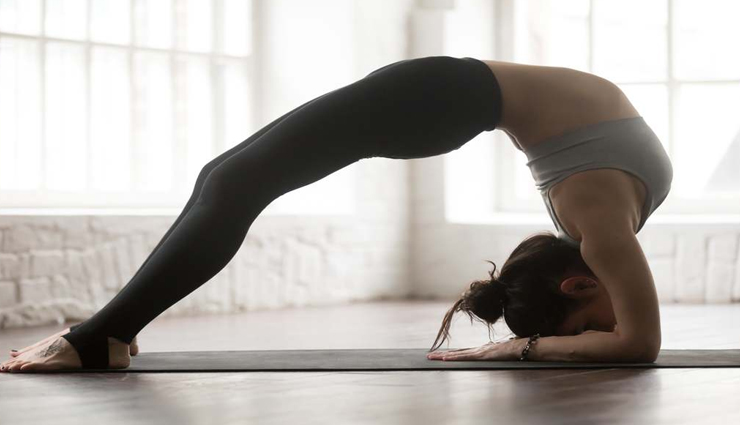
# Sethu Bandhasana (Bridge Pose)
- Begin by lying flat on your back on a yoga mat with your knees bent and your feet flat on the floor. Your feet should be hip-width apart, and your arms should rest by your sides, palms facing down.
- Make sure your feet are close enough to your hips that you can just barely touch your heels with your fingertips.
- Take a moment to ground yourself and relax in this position, taking a few deep breaths to settle into the pose.
- As you exhale, engage your core muscles and press your feet into the mat.
- On your next inhale, begin to lift your hips off the ground by pushing through your feet. At the same time, roll your spine off the mat, starting from the lower back, and lifting your hips and then your mid-back off the ground.
- Continue to press your arms and shoulders into the mat to lift your chest slightly. Your weight should be on your feet, shoulders, and upper arms.
- Keep your knees aligned over your ankles, ensuring they don't splay outward.
- Your thighs should be roughly parallel to the floor, and your chest should be reaching toward your chin.
- Hold this position, maintaining steady, even breaths. You can also clasp your hands under your body and press your arms down to lift your chest higher if desired.
- Ensure that your neck and head are relaxed and in a neutral position. Your gaze should be upward, not turned to the side.
- Hold Sethu Bandhasana for 30 seconds to 1 minute, focusing on your breath and the stretch in your chest and hip flexors.
- To release, exhale and gently lower your spine back down to the mat, starting from the upper back, mid-back, and then the lower back.
- Rest for a moment with your knees bent and feet on the floor before moving on to another pose or relaxation.

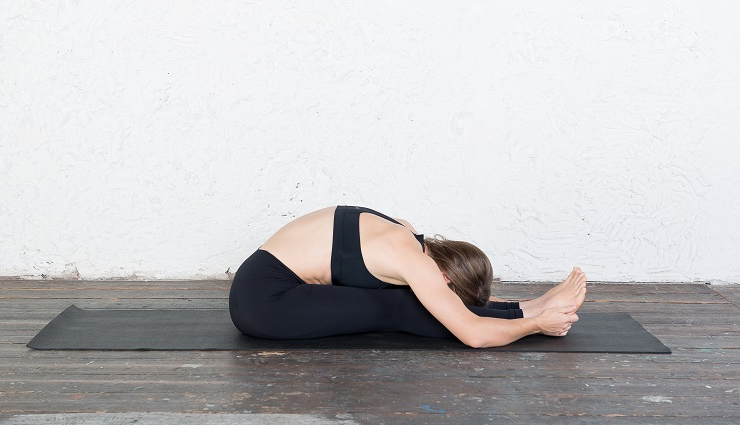
# Balasana (Child Pose)
- Start by kneeling on your yoga mat. Your big toes should touch, and your knees should be about hip-width apart.
- Sit back on your heels and take a moment to find a comfortable and balanced position.
- Inhale deeply, and as you exhale, bend forward from your hips, lowering your torso toward the floor.
- Extend your arms forward on the mat, reaching your hands out as far as you can. Your palms should be facing down.
- Continue to exhale as you lower your forehead and chest toward the mat. If your forehead doesn't touch the floor, that's perfectly fine. You can rest it on a yoga block, a cushion, or simply on the mat.
- Let your chest and abdomen rest on or between your thighs, and relax your shoulders down toward the mat.
- Allow your arms to be fully extended, and your fingers to be spread wide apart. Feel a gentle stretch in your back and shoulders.
- Close your eyes and focus on your breath. Take deep, slow breaths in and out through your nose, allowing your body to relax with each exhalation.
- As you hold this pose, let go of any tension in your neck and shoulders, and surrender to the feeling of relaxation and release.
- Stay in Balasana for as long as you like, typically 1 to 5 minutes, or even longer if it feels comfortable and soothing.
- To release the pose, gently walk your hands back toward your body, using your hands for support, and slowly sit back on your heels.